Defining Actions
Actions determine what happens to the target field when rule conditions are met. They control field visibility, validation, editability, values, labels, descriptions, and available options.
Formify provides seven actions:
- Show / Hide Field - Control field visibility
- Make Field Required - Add conditional validation
- Lock Field (Read-Only) - Prevent editing
- Set Field Value - Auto-populate values
- Change Field Label - Modify field names
- Change Field Description - Update help text
- Limit Field Options - Control dropdown options
Each action solves specific problems and has particular use cases where it excels.
Choosing the Right Action
Use this quick reference to select the appropriate action:
| Goal | Action | Example |
|---|---|---|
| Hide irrelevant fields | Show / Hide Field | Hide "Root Cause" for low-priority bugs |
| Enforce data entry in specific contexts | Make Field Required | Require "Business Justification" when cost > $10k |
| Prevent accidental edits | Lock Field | Lock "Fix Versions" when Status = Done |
| Auto-fill values | Set Field Value | Set Component = "Backend" for Backend Bugs |
| Clarify field meaning | Change Field Label | Change "Description" to "Steps to Reproduce" for Bugs |
| Provide context-specific guidance | Change Field Description | Add help text explaining SLA expectations |
| Prevent invalid selections | Limit Field Options | Show only P1/P2 priorities for critical bugs |
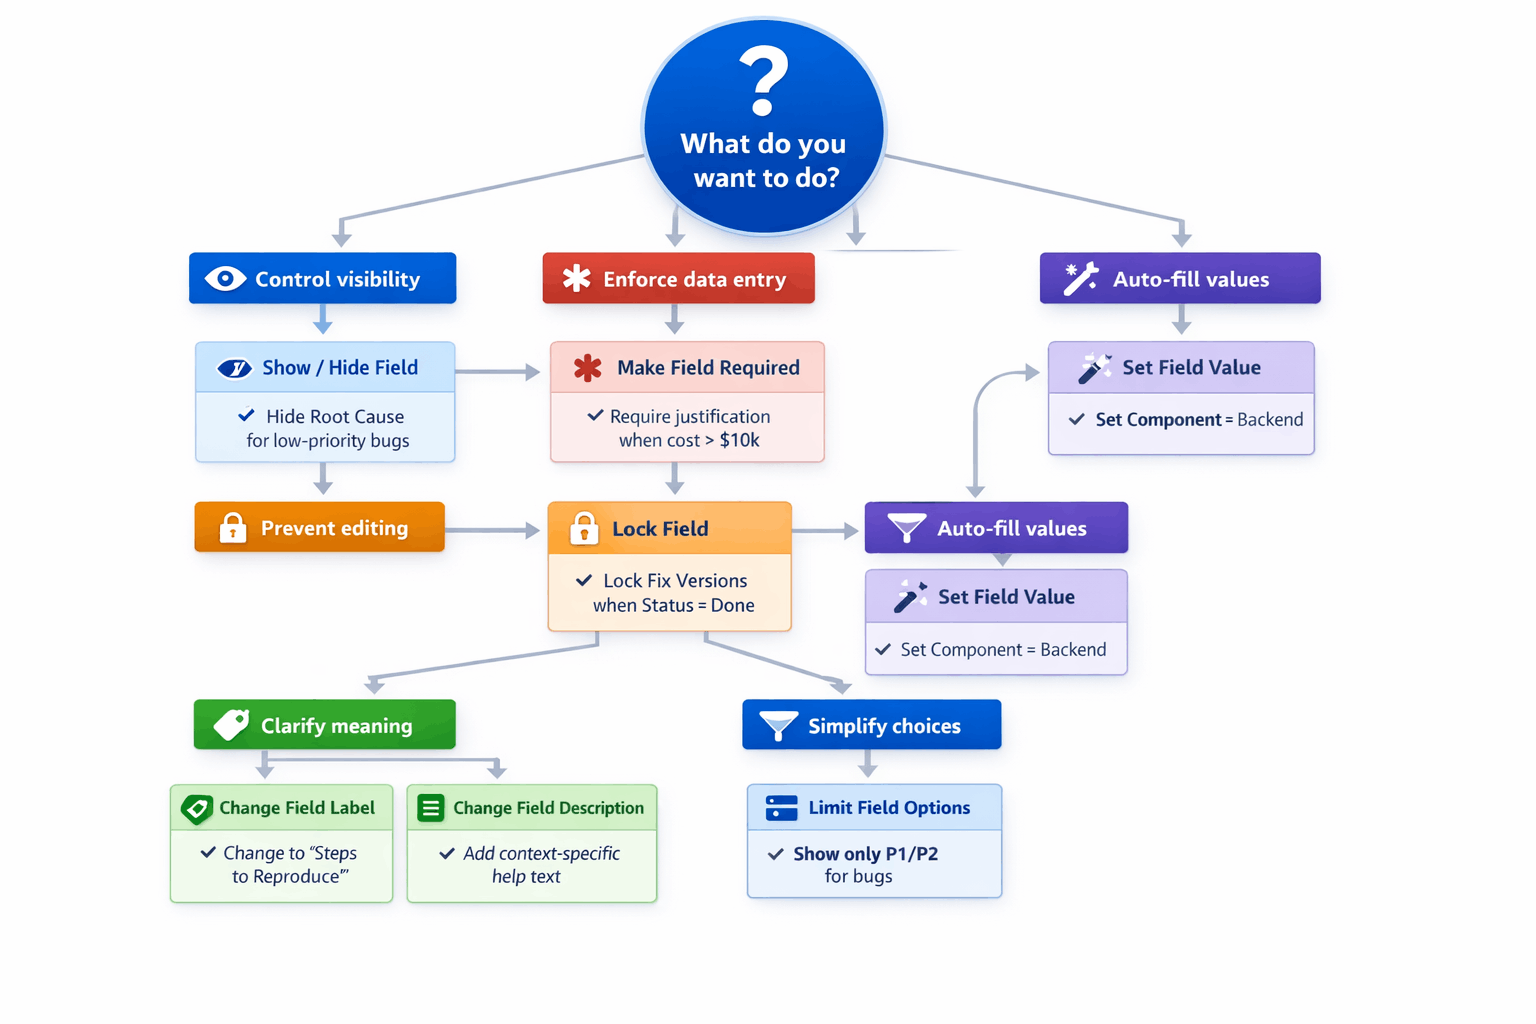
Decision tree for choosing the right action based on your goal
Show / Hide Field
Control field visibility based on conditions. Fields appear when conditions are met and remain hidden otherwise.
When to Use
Use Show/Hide Field for:
- Progressive disclosure - Reveal fields only when relevant
- Clean forms - Keep forms simple by hiding unnecessary fields
- Context-aware interfaces - Show fields only in appropriate situations
- Reducing cognitive load - Users see only what they need
How It Works
When conditions are met, the field becomes visible on the screen. When conditions are not met, the field is hidden.
Important behaviors:
On Global Issue Create:
- Hidden fields retain values if filled before hiding
- If user fills a field, then conditions change and field hides, the value persists and saves when issue is created
- This prevents data loss during form filling
On Issue View:
- Fields can show/hide during inline editing
- Hidden fields don't display in view mode
On Issue Transition:
- Fields show/hide on transition dialogs based on conditions
Supported Screens
| Screen | Supported |
|---|---|
| Global Issue Create | ✅ Yes |
| Issue View | ✅ Yes |
| Issue Transition | ✅ Yes |
Configuration
1. Select Action: Show / Hide Field
2. Configure behavior (if applicable):
- Most implementations default to "Show when conditions are met"
- Some UIs offer "Hide when conditions are met" option
3. No additional parameters typically required
Practical Examples
Example 1: Progressive disclosure
Business need: "Show 'Root Cause' field only for high-priority bugs to reduce form clutter."
Configuration:
- Target field: Root Cause
- Screen: Global Issue Create
- Conditions:
- Issue Type = Bug
- Priority = High OR Critical
- Action: Show / Hide Field
Result: Root Cause appears only when creating high or critical priority bugs.
Why it works: Users working on routine bugs get a clean form. When they select high priority, the form adapts to show Root Cause without them needing to know when it's required.
Example 2: Conditional field visibility
Business need: "Show 'Please Explain' text field when user selects 'No' on satisfaction survey."
Configuration:
- Target field: Please Explain
- Screen: Global Issue Create
- Conditions:
- Satisfaction = Dissatisfied
- Action: Show / Hide Field
Result: Explanation field appears only when user indicates dissatisfaction.
Why it works: Satisfied users don't see unnecessary fields. Dissatisfied users automatically get an explanation field without requiring manual navigation.
Example 3: Role-based field visibility
Business need: "Show 'Budget' field only to Finance team members."
Configuration:
- Target field: Budget
- Screen: Issue View
- Conditions:
- User in group = Finance
- Action: Show / Hide Field
Result: Finance team members see Budget field; others don't.
Why it works: Sensitive financial information stays visible only to authorized users, maintaining security while allowing collaboration.
Limitations & Considerations
Can't hide native-required fields
If a field is marked as required in Jira's screen configuration, you can't hide it. Hiding required fields creates validation conflicts (users can't submit forms because they can't fill required fields they can't see).
Solution: Remove native required status from the field in screen configuration, then use "Make Field Required" action with conditions instead.
Hidden fields on Issue View
On Issue View, empty hidden fields don't display. If a field is hidden and has no value, it simply doesn't appear—users won't see a blank space.
Field must be on screen
You can only show/hide fields already added to the Jira screen. Add fields through Project Settings → Screens first.
Make Field Required
Add conditional validation—make fields required only when specific conditions are met.
When to Use
Use Make Field Required for:
- Context-specific validation - Require data only when needed
- Data quality - Ensure critical information is captured in important scenarios
- Workflow gates - Prevent progression without necessary information
- Flexible forms - Avoid forcing users to fill fields that aren't always relevant
How It Works
When conditions are met, the field displays a red asterisk and becomes required. Users must fill the field before submitting the form.
When conditions are not met, the field is optional.
Important behaviors:
Validation happens client-side:
- Users see the required indicator immediately when conditions are met
- Form won't submit until required fields are filled
- Real-time feedback as users fill the form
Required fields must be visible:
- You can't require a hidden field
- If using Show/Hide and Make Required together, ensure the Show rule also applies when you want the field required
Supported Screens
| Screen | Supported |
|---|---|
| Global Issue Create | ✅ Yes |
| Issue View | ❌ No (API limitation) |
| Issue Transition | ✅ Yes |
API Limitation: The "Make Field Required" action is not supported on Issue View due to Atlassian's UI Modifications API constraints. Use this action only on Global Issue Create or Issue Transition screens.
Configuration
1. Select Action: Make Field Required
2. No additional parameters typically required
3. Ensure field is visible when conditions are met (use Show/Hide action if needed)
Practical Examples
Example 1: High-priority validation
Business need: "Require 'Root Cause' field for high-priority incidents to ensure proper documentation."
Configuration:
- Target field: Root Cause
- Screen: Global Issue Create
- Conditions:
- Issue Type = Incident
- Priority = High OR Critical
- Action: Make Field Required
Result: Root Cause becomes required when creating high or critical priority incidents.
Why it works: Routine incidents stay simple with optional Root Cause. High-priority incidents enforce data quality by requiring root cause analysis.
Example 2: Threshold-based validation
Business need: "Require 'Business Justification' when estimated cost exceeds $10,000."
Configuration:
- Target field: Business Justification
- Screen: Global Issue Create
- Conditions:
- Estimated Cost > 10000
- Action: Make Field Required
Result: Business Justification becomes required when cost estimates exceed $10k.
Why it works: Low-cost items don't need justification documentation, keeping the process lightweight. High-cost items automatically require justification without manual oversight.
Example 3: Transition validation
Business need: "Require 'Test Results' field before transitioning Bug issues to 'Done' status."
Configuration:
- Target field: Test Results
- Screen: Issue Transition
- Conditions:
- Status = Done (target status)
- Issue Type = Bug
- Action: Make Field Required
Result: Test Results becomes required on the transition dialog when moving Bugs to Done.
Why it works: Creates a workflow gate—bugs can't be marked Done without test results. Other transitions don't require this field, maintaining flexible workflow for other cases.
Combining with Show/Hide
Often you'll want to both show AND require a field in the same context.
Approach 1: Separate rules
Create two rules for the same field:
- Rule 1: Show field when conditions X
- Rule 2: Make field required when conditions X
Approach 2: Single rule with multiple actions (if supported by UI)
Some configurations let you apply multiple actions in one rule:
- Conditions: X
- Actions: Show field + Make field required
Best practice: Use the same conditions for both Show and Make Required. If conditions differ, users might see a required field indicator on a hidden field (confusing) or see an optional field that should be required.
Limitations & Considerations
Not supported on Issue View
Due to Atlassian API limitations, you can't make fields required during inline editing on Issue View. Use this action only on Create and Transition screens.
Native required fields can't be made optional
If a field is marked required in Jira's screen configuration, it's always required. Rules can only ADD required validation, not remove it.
Solution: Remove native required status, then use rules for all required validation.
Required field must be visible
If a field is hidden, making it required creates validation issues. Users can't submit because a required field is hidden.
Solution: Always show fields before requiring them.
Related: Field Validation Rules - For more sophisticated validation beyond "has value," see Defining Field Validations. Validation rules support threshold checks (dates, numbers, text length), custom error messages, cross-field consistency, and 15+ validation types—all with real-time feedback as users type.
Lock Field (Read-Only)
Make fields read-only to prevent editing. Users can see the field value but can't change it.
When to Use
Use Lock Field for:
- Guard rails - Prevent accidental edits in certain workflow stages
- Status-based protection - Lock fields when issues reach final states
- Role-based restrictions - Prevent edits by users without proper authority
- Audit trail protection - Preserve historical data by locking fields after certain points
How It Works
When conditions are met, the field displays in read-only mode. Users can see the value but can't edit it.
When conditions are not met, the field is editable (unless natively read-only).
Important behaviors:
On Global Issue Create:
- Locked fields can still be set by "Set Field Value" actions
- Users see the pre-filled value but can't change it
- Useful for controlled defaults
On Issue Transition:
- Locked fields appear on transition dialog but can't be changed
- Users can see current value without ability to modify
Supported Screens
| Screen | Supported |
|---|---|
| Global Issue Create | ✅ Yes |
| Issue View | ❌ No (API limitation) |
| Issue Transition | ✅ Yes |
API Limitation: The "Lock Field" action is not supported on Issue View due to Atlassian's UI Modifications API constraints. Use this action only on Global Issue Create or Issue Transition screens.
Configuration
1. Select Action: Lock Field (Read-Only)
2. No additional parameters typically required
Practical Examples
Example 1: Lock auto-filled field during creation
Business need: "Lock 'Component' field after auto-filling it based on issue type."
Configuration:
- Target field: Component
- Screen: Global Issue Create
- Conditions:
- Issue Type = Backend Bug
- Action: Lock Field
Result: Component becomes read-only when creating Backend Bugs (combined with Set Field Value rule to auto-fill).
Why it works: Auto-filled values shouldn't be changed. Locking the field prevents users from overriding the pre-selected component.
Example 2: Lock field during transition
Business need: "Lock 'Resolution' field when transitioning to Done to prevent changes after selection."
Configuration:
- Target field: Resolution
- Screen: Issue Transition
- Conditions:
- Status = Done (target status)
- Action: Lock Field
Result: Resolution is shown but read-only on the Done transition dialog.
Why it works: When combined with Set Field Value that pre-fills Resolution, this ensures the auto-selected resolution can't be changed during the transition.
Example 3: Role-based locking on transition
Business need: "Lock 'Release Date' during transitions for all users except Release Managers."
Configuration:
- Target field: Release Date
- Screen: Issue Transition
- Conditions:
- User NOT in role = Release Manager
- Action: Lock Field
Result: Release Date is read-only on transition dialogs for non-Release Managers.
Why it works: Only Release Managers can modify release dates during transitions.
Combining with Set Field Value
Lock Field works well with Set Field Value for controlled auto-population.
Example: "Auto-fill and lock 'Resolution' when transitioning to Done"
Rule 1 - Set value:
- Target field: Resolution
- Screen: Issue Transition
- Conditions: Status = Done
- Action: Set Field Value = Fixed
Rule 2 - Lock field:
- Target field: Resolution
- Screen: Issue Transition
- Conditions: Status = Done
- Action: Lock Field
Result: Resolution auto-fills with "Fixed" and becomes read-only on Done transition.
Limitations & Considerations
Not supported on Issue View
Due to Atlassian API limitations, you can't lock fields during inline editing on Issue View. Use this action only on Create and Transition screens.
Locked fields can still be set by automation
Locking prevents manual editing but doesn't prevent:
- Jira Automation rules from updating the field
- Other Formify from setting values
- API updates
Lock applies to UI only, not to all update mechanisms.
Set Field Value
Automatically populate field values based on conditions. Reduce manual work and ensure consistency.
When to Use
Use Set Field Value for:
- Pre-fill defaults - Auto-populate fields based on selections
- Computed values - Calculate dates, copy values from other fields
- Consistency - Ensure standard values are used in specific contexts
- Workflow automation - Auto-fill fields during transitions
- Reduce manual entry - Save users time by filling predictable values
How It Works
When conditions are met, the field value is set to your specified value (static or Smart Value).
Users can typically edit the value unless the field is also locked.
Important behaviors:
On Global Issue Create:
- Value is set when conditions are met
- User can override the value (unless field is locked)
- Value saves when issue is created
On Issue Transition:
- Value is set when transition dialog opens (if conditions met)
- Value saves when transition completes
Supported Screens
| Screen | Supported |
|---|---|
| Global Issue Create | ✅ Yes |
| Issue View | ❌ No (API limitation) |
| Issue Transition | ✅ Yes |
API Limitation: The "Set Field Value" action is not supported on Issue View due to Atlassian's UI Modifications API constraints. Use this action only on Global Issue Create or Issue Transition screens.
Configuration
1. Select Action: Set Field Value
2. Choose value type:
- Static value - Fixed text, number, or selection
- Smart Value - Computed expression (see Using Smart Values)
3. Enter the value:
- For text fields: Enter the text
- For select fields: Choose the option
- For date fields: Enter date or Smart Value expression
- For user fields: Select the user or use Smart Value
Value Types
Static Values
Fixed values that don't change.
Examples:
- Text: "Please contact support for urgent issues"
- Number: 5
- Select option: "Backend"
- Date: 2026-03-15
- User: John Smith
Smart Values
Computed expressions that calculate values dynamically.
Examples:
- Date math:
nextBusinessDay()- Tomorrow (skipping weekends) - Field references:
field('duedate')- Copy value from Due Date field - Conditional logic:
if(field('priority') == 'High', 'Urgent', 'Normal')
See Using Smart Values for detailed Smart Value syntax and examples.
Practical Examples
Example 1: Context-based pre-fill
Business need: "Auto-fill Component = 'Backend' when creating Backend Bug issues."
Configuration:
- Target field: Component
- Screen: Global Issue Create
- Conditions:
- Issue Type = Backend Bug
- Action: Set Field Value
- Value: Backend (static)
Result: Component field auto-fills with "Backend" when creating Backend Bugs.
Why it works: Users don't need to remember to select the component—it's filled automatically based on issue type, ensuring consistency and saving time.
Example 2: Computed date value
Business need: "Set Due Date to next business day when creating P1 incidents."
Configuration:
- Target field: Due Date
- Screen: Global Issue Create
- Conditions:
- Priority = Critical
- Issue Type = Incident
- Action: Set Field Value
- Value:
nextBusinessDay()(Smart Value)
Result: Due Date auto-fills with tomorrow's date (skipping weekends) for critical incidents.
Why it works: Critical incidents have standard 24-hour SLA. Smart Value calculates next business day automatically, ensuring consistent SLA tracking.
Example 3: Transition-based value
Business need: "Set Resolution = 'Fixed' when transitioning Bug to Done."
Configuration:
- Target field: Resolution
- Screen: Issue Transition
- Conditions:
- Status = Done (target status)
- Issue Type = Bug
- Action: Set Field Value
- Value: Fixed (static)
Result: Resolution auto-fills with "Fixed" on the Done transition for Bugs.
Why it works: Most bugs marked Done are Fixed, not other resolutions. Pre-filling saves time while allowing override for edge cases (Won't Fix, Duplicate, etc.).
Example 4: Copy field value
Business need: "Copy 'Original Estimate' to 'Remaining Estimate' when starting work."
Configuration:
- Target field: Remaining Estimate
- Screen: Issue Transition
- Conditions:
- Status = In Progress (target status)
- Action: Set Field Value
- Value:
field('timeestimate')(Smart Value)
Result: Remaining Estimate auto-fills with Original Estimate value when starting work.
Why it works: At the start of work, remaining estimate equals original estimate. Smart Value copies the value automatically without manual entry.
Combining with Lock Field
Set Field Value + Lock Field creates controlled auto-population where users can't override.
Example: "Auto-fill and lock 'Approved Date' when status becomes Approved"
Rule 1 - Set value:
- Target field: Approved Date
- Conditions: Status = Approved
- Action: Set Field Value = today
Rule 2 - Lock field:
- Target field: Approved Date
- Conditions: Status = Approved
- Action: Lock Field
Result: Approved Date fills with today's date and becomes read-only.
Use case: Audit trails where the date must reflect when approval occurred, not when someone manually fills it.
Limitations & Considerations
Field must be editable (unless locked by same rule)
You can't set values for fields that are natively read-only (e.g., Reporter, Created date).
Smart Value syntax errors
Invalid Smart Value expressions will fail silently or display errors. Test Smart Values to ensure correct syntax.
See Using Smart Values for troubleshooting.
Field type must match value type
- Date fields need date values
- Number fields need numeric values
- Select fields need valid option names
Incorrect type matching causes the action to fail.
Change Field Label
Modify the displayed label (name) of a field based on conditions. Provide context-specific field names.
When to Use
Use Change Field Label for:
- Context-aware naming - Clarify field purpose in different situations
- User guidance - Make field purpose obvious based on context
- Workflow-specific terminology - Adapt field names to workflow stages
- Reduce confusion - Use precise names for different use cases
How It Works
When conditions are met, the field label changes to your specified text.
The field remains the same—only the displayed name changes. The field ID and stored data don't change.
Important behaviors:
Label changes are cosmetic:
- Changes appear only on the UI
- Field data and configuration remain unchanged
- Users see different labels in different contexts
Multiple rules can't conflict:
- If multiple rules try to change the same field's label, last-applied rule wins
- Avoid conflicting label changes for the same field in the same context
Supported Screens
| Screen | Supported |
|---|---|
| Global Issue Create | ✅ Yes |
| Issue View | ✅ Yes |
| Issue Transition | ✅ Yes |
Configuration
1. Select Action: Change Field Label
2. Enter new label text:
- Plain text (no formatting typically)
- Keep it short and descriptive
- Use consistent terminology
Practical Examples
Example 1: Issue-type-specific labels
Business need: "Change 'Description' field label to 'Steps to Reproduce' for Bug issues."
Configuration:
- Target field: Description
- Screen: Global Issue Create
- Conditions:
- Issue Type = Bug
- Action: Change Field Label
- New label: Steps to Reproduce
Result: Description field shows as "Steps to Reproduce" when creating Bugs.
Why it works: Bugs need reproduction steps, not just descriptions. The label change guides users to provide the right information without changing the underlying field.
Example 2: Status-based labels
Business need: "Change 'Description' to 'Resolution Details' when Status = Done."
Configuration:
- Target field: Description
- Screen: Issue View
- Conditions:
- Status = Done
- Action: Change Field Label
- New label: Resolution Details
Result: Description field label changes to "Resolution Details" for Done issues.
Why it works: Fields serve different purposes in different workflow stages. In Done status, Description becomes Resolution Details, clarifying what information belongs there.
Example 3: Priority-based labels
Business need: "Change 'Due Date' to 'SLA Deadline' for Critical priority issues."
Configuration:
- Target field: Due Date
- Screen: Global Issue Create
- Conditions:
- Priority = Critical
- Action: Change Field Label
- New label: SLA Deadline
Result: Due Date field shows as "SLA Deadline" for Critical priority issues.
Why it works: Critical issues have strict SLA deadlines, not just due dates. The label change emphasizes the urgency and importance.
Limitations & Considerations
Keep labels short
Long labels may be truncated or cause layout issues. Keep labels concise and clear.
Maintain consistency
Don't change labels too frequently or unpredictably. Users should understand what each label means in context.
No formatting
Field labels are typically plain text. You can't add bold, colors, or other formatting.
Change Field Description�
Modify the help text (description) shown below the field label. Provide context-specific guidance.
When to Use
Use Change Field Description for:
- Context-specific guidance - Provide relevant instructions based on situation
- User education - Explain what's expected in different contexts
- Policy enforcement - Remind users of rules or requirements
- Reduce support requests - Answer common questions inline
How It Works
When conditions are met, the field description (help text) changes to your specified text.
The field description appears below the field label, providing additional context or instructions.
Important behaviors:
Descriptions support basic formatting (varies by field type):
- Plain text always works
- Some fields support basic HTML or markdown (check platform support)
Multiple rules can't conflict:
- If multiple rules try to change the same field's description, last-applied rule wins
Supported Screens
| Screen | Supported |
|---|---|
| Global Issue Create | ✅ Yes |
| Issue View | ✅ Yes |
| Issue Transition | ✅ Yes |
Configuration
1. Select Action: Change Field Description
2. Enter new description text:
- Can be longer than labels
- Provide helpful guidance or instructions
- Use basic formatting if supported
Practical Examples
Example 1: Priority-specific guidance
Business need: "Provide SLA guidance for priority field based on issue type."
Configuration:
- Target field: Priority
- Screen: Global Issue Create
- Conditions:
- Issue Type = Incident
- Action: Change Field Description
- New description: "P1/P2 for production incidents have 4-hour and 24-hour SLAs respectively. Use P3+ for non-urgent issues."
Result: Priority field shows SLA guidance for Incident issues.
Why it works: Users creating incidents see SLA context immediately, helping them choose appropriate priority without consulting documentation.
Example 2: Status-specific instructions
Business need: "Explain what's required before transitioning to Done."
Configuration:
- Target field: Description
- Screen: Issue Transition
- Conditions:
- Status = Done (target status)
- Action: Change Field Description
- New description: "Provide final resolution details, including root cause and actions taken."
Result: Description field shows completion guidance on Done transition.
Why it works: Users see exactly what to document before completing the issue, improving data quality at the critical moment.
Example 3: Role-specific help
Business need: "Provide budget guidelines to Finance team when filling budget field."
Configuration:
- Target field: Budget
- Screen: Issue View
- Conditions:
- User in group = Finance
- Action: Change Field Description
- New description: "Enter approved budget code. Contact finance-ops@company.com for new codes."
Result: Finance team sees budget help text; others don't see the field at all (use Show/Hide rule).
Why it works: Targeted help text appears only for users who need it, reducing clutter for others.
Limitations & Considerations
Description length
Very long descriptions may be truncated or cause layout issues. Keep descriptions focused and concise.
Formatting support varies
Some fields support HTML/markdown, others plain text only. Test to ensure formatting renders correctly.
Don't replace documentation
Descriptions are helpful hints, not complete documentation. Link to full documentation for complex topics.
Limit Field Options
Control which options appear in select fields, multi-select fields, and other option-based fields. Show or hide specific options based on conditions.
When to Use
Use Limit Field Options for:
- Clean dropdowns - Remove irrelevant options
- Prevent invalid selections - Hide options that don't apply
- Context-specific options - Show different options in different situations
- Simplify choices - Reduce cognitive load by limiting options
How It Works
When conditions are met, only the specified options appear in the field's dropdown or option list.
Options not in the "show" list are hidden—users can't select them.
Important behaviors:
Existing values are preserved:
- If a field already has a value that's hidden by the rule, the value persists
- This prevents data loss when rules change option visibility
Field must support options:
- Only works for fields with predefined options (selects, multi-selects, checkboxes, etc.)
- Doesn't apply to free-text fields
Supported Screens
| Screen | Supported |
|---|---|
| Global Issue Create | ✅ Yes |
| Issue View | ❌ No (API limitation) |
| Issue Transition | ✅ Yes |
API Limitation: The "Limit Field Options" action is not supported on Issue View due to Atlassian's UI Modifications API constraints. Use this action only on Global Issue Create or Issue Transition screens.
Supported Field Types
System fields:
- Priority
- Resolution
- Issue Type (on some screens)
- Fix Versions
- Affects Versions
- Components
Custom fields:
- Single Select
- Multi-Select
- Checkboxes
- Radio Buttons
- Cascading Select
Configuration
1. Select Action: Limit Field Options
2. Configure option visibility:
- Show only these options: Select which options should be visible
- Hide these options: Select which options should be hidden (alternative approach)
3. Select the options from the available list
Practical Examples
Example 1: Priority limiting for Bugs
Business need: "Show only 'P1' and 'P2' priorities for Bug issues—lower priorities aren't allowed for bugs."
Configuration:
- Target field: Priority
- Screen: Global Issue Create
- Conditions:
- Issue Type = Bug
- Action: Limit Field Options
- Show options: P1 (Critical), P2 (High)
Result: Only P1 and P2 appear in Priority dropdown for Bugs.
Why it works: Prevents users from creating low-priority bugs. All bugs must be P1 or P2, and limiting options enforces this policy at input time.
Example 2: Status-based resolution options
Business need: "Show different Resolution options based on status."
Configuration:
Rule 1 - For Done status:
- Target field: Resolution
- Screen: Issue Transition
- Conditions:
- Status = Done
- Action: Limit Field Options
- Show options: Fixed, Done, Completed
Rule 2 - For Closed status:
- Target field: Resolution
- Screen: Issue Transition
- Conditions:
- Status = Closed
- Action: Limit Field Options
- Show options: Won't Fix, Duplicate, Cannot Reproduce
Result: Different resolution options appear for Done vs Closed transitions.
Why it works: Different workflow outcomes need different resolutions. Done issues are completed (Fixed, Done), while Closed issues are terminated (Won't Fix, Duplicate). Limiting options prevents confusion.
Example 3: Hide obsolete options
Business need: "Hide deprecated component options to prevent selection on new issues."
Configuration:
- Target field: Components
- Screen: Global Issue Create
- Conditions: (none - always apply)
- Action: Limit Field Options
- Hide options: Legacy Component A, Deprecated Module B
Result: Legacy components don't appear in dropdown for new issues or edits.
Why it works: Existing issues keep their legacy component values (visible on view), but users can't select obsolete options for new work. Gradual deprecation without data loss.
Example 4: Context-specific options
Business need: "Show different component options for Frontend vs Backend issue types."
Configuration:
Rule 1 - Frontend components:
- Target field: Components
- Screen: Global Issue Create
- Conditions:
- Issue Type = Frontend Bug OR Frontend Task
- Action: Limit Field Options
- Show options: UI, API Client, Dashboard, Mobile App
Rule 2 - Backend components:
- Target field: Components
- Screen: Global Issue Create
- Conditions:
- Issue Type = Backend Bug OR Backend Task
- Action: Limit Field Options
- Show options: Database, API Server, Authentication, Queue
Result: Frontend issues see frontend components; backend issues see backend components.
Why it works: Users can't accidentally select wrong components. The form adapts to show relevant options based on issue type, preventing errors and reducing dropdown clutter.
Limitations & Considerations
Option name must match exactly
Option names are case-sensitive and must match exactly. "High" is different from "high."
Existing values persist
If an issue already has a value that's later hidden, the value remains. Users see the value but can't select it again if they clear it.
Combining multiple Limit Options rules
If multiple rules try to limit the same field's options, results depend on rule evaluation order. Typically, the most restrictive rule wins.
Best practice: Avoid overlapping Limit Options rules for the same field. Use mutually exclusive conditions.
Combining Multiple Actions
You can create multiple rules targeting the same field with different actions to achieve complex behaviors.
Common Combinations
1. Show + Require
Show a field and make it required in the same context.
Example:
- Rule 1: Show "Root Cause" when Priority = High
- Rule 2: Make "Root Cause" required when Priority = High
Result: Root Cause appears and is required for high-priority issues.
2. Set Value + Lock
Auto-fill a field and prevent editing.
Example:
- Rule 1: Set "Approved Date" = today when Status = Approved
- Rule 2: Lock "Approved Date" when Status = Approved
Result: Approved Date fills automatically and can't be changed.
3. Show + Change Label + Change Description
Show a field with custom label and description in specific context.
Example:
- Rule 1: Show "Custom Field 1" when Issue Type = Bug
- Rule 2: Change label to "Steps to Reproduce" when Issue Type = Bug
- Rule 3: Change description to "Provide detailed reproduction steps" when Issue Type = Bug
Result: Field appears with bug-specific label and help text.
4. Limit Options + Set Value
Limit options and set a default from the limited set.
Example:
- Rule 1: Limit Priority to [P1, P2] when Issue Type = Production Bug
- Rule 2: Set Priority = P1 when Issue Type = Production Bug
Result: Priority dropdown shows only P1/P2, with P1 pre-selected.
Best Practices for Multiple Actions
Use consistent conditions
If combining actions for the same field, use identical conditions to ensure actions apply together.
Test interactions
Verify that multiple actions work together as expected. Some combinations may have unexpected results.
Keep it simple
Don't over-engineer. Use multiple actions only when necessary for your business requirements.
Action Support Matrix
Quick reference for which actions work on which screens:
| Action | Global Issue Create | Issue View | Issue Transition |
|---|---|---|---|
| Show / Hide Field | ✅ | ✅ | ✅ |
| Make Field Required | ✅ | ❌ | ✅ |
| Lock Field | ✅ | ❌ | ✅ |
| Set Field Value | ✅ | ❌ | ✅ |
| Change Field Label | ✅ | ✅ | ✅ |
| Change Field Description | ✅ | ✅ | ✅ |
| Limit Field Options | ✅ | ❌ | ✅ |
Screen limitations come from Atlassian's UI Modifications API, not Formify. All limitations are platform-level constraints.
Next Steps
Now that you understand all available actions:
Learn advanced techniques:
- Using Smart Values - Computed values and dynamic expressions for Set Field Value
See actions in practice:
- Progressive Disclosure - Show/Hide examples
- Dynamic Required Fields - Make Required examples
- Field Locking on Transitions - Lock Field examples
- Pre-fill Values - Set Field Value examples
- Clean Dropdowns - Limit Options examples
Manage your rules:
- Managing Rules - Organize, enable, disable, and edit rules
Understand field support:
- Supported Fields per Screen - Detailed field compatibility matrix
- Screen-Specific Limitations - Known limitations and workarounds
Ready to learn about computed values? Continue to Using Smart Values.