Quick Start Guide
Create your first Dynamic Screen Rules rule in under 10 minutes with this step-by-step tutorial. You'll learn the basics by building a practical rule that shows a field only when specific conditions are met.
⏱️ Time to complete: 10 minutes | 🎯 Difficulty: Beginner | 📚 What you'll build: A progressive disclosure rule
What You'll Build
In this guide, you'll create a rule that demonstrates progressive disclosure - one of the most common use cases for Dynamic Screen Rules.
The rule: Hide the "Root Cause" field for Bug issues when Priority is High.
Why this is useful: This rule keeps your create issue screen clean by hiding the Root Cause field for high-priority bugs. The field remains visible for lower-priority bugs where detailed root cause analysis might be needed during initial triage.
What You'll Learn
| Configuration Access | How to navigate to the Dynamic Screen Rules configuration panel in your Jira project |
| Rule Creation | How to create a new rule with screen selection and target field configuration |
| Scoping Rules | How to limit rules to specific issue types (Bugs, Stories, etc.) |
| Field Conditions | How to add field-based conditions that trigger when values change |
| Testing Rules | How to verify your rule works correctly in real-time |
Before you start: Make sure Dynamic Screen Rules is installed in your Jira instance. See Installation & Setup if you haven't installed it yet.
Prerequisites
Before you begin, make sure you have the following:
- Project Administrator permissions in any Jira project
- A "Root Cause" field added to your project's create screen
- This can be any text field or paragraph field
- If you don't have this field, you can use any other field for practice
- Bug issue type available in your project
- Dynamic Screen Rules installed (see Installation & Setup)
Don't have a Root Cause field? No problem! You can follow this tutorial using any field on your screen. The principle is the same - you're learning how to show/hide fields based on conditions.
Creating Your First Rule - Step by Step
Navigate to Dynamic Screen Rules
- Open the Jira project where you want to create the rule
- Click Project Settings in the left sidebar
- Scroll down to the Apps section in the left menu
- Click Dynamic Screen Rules
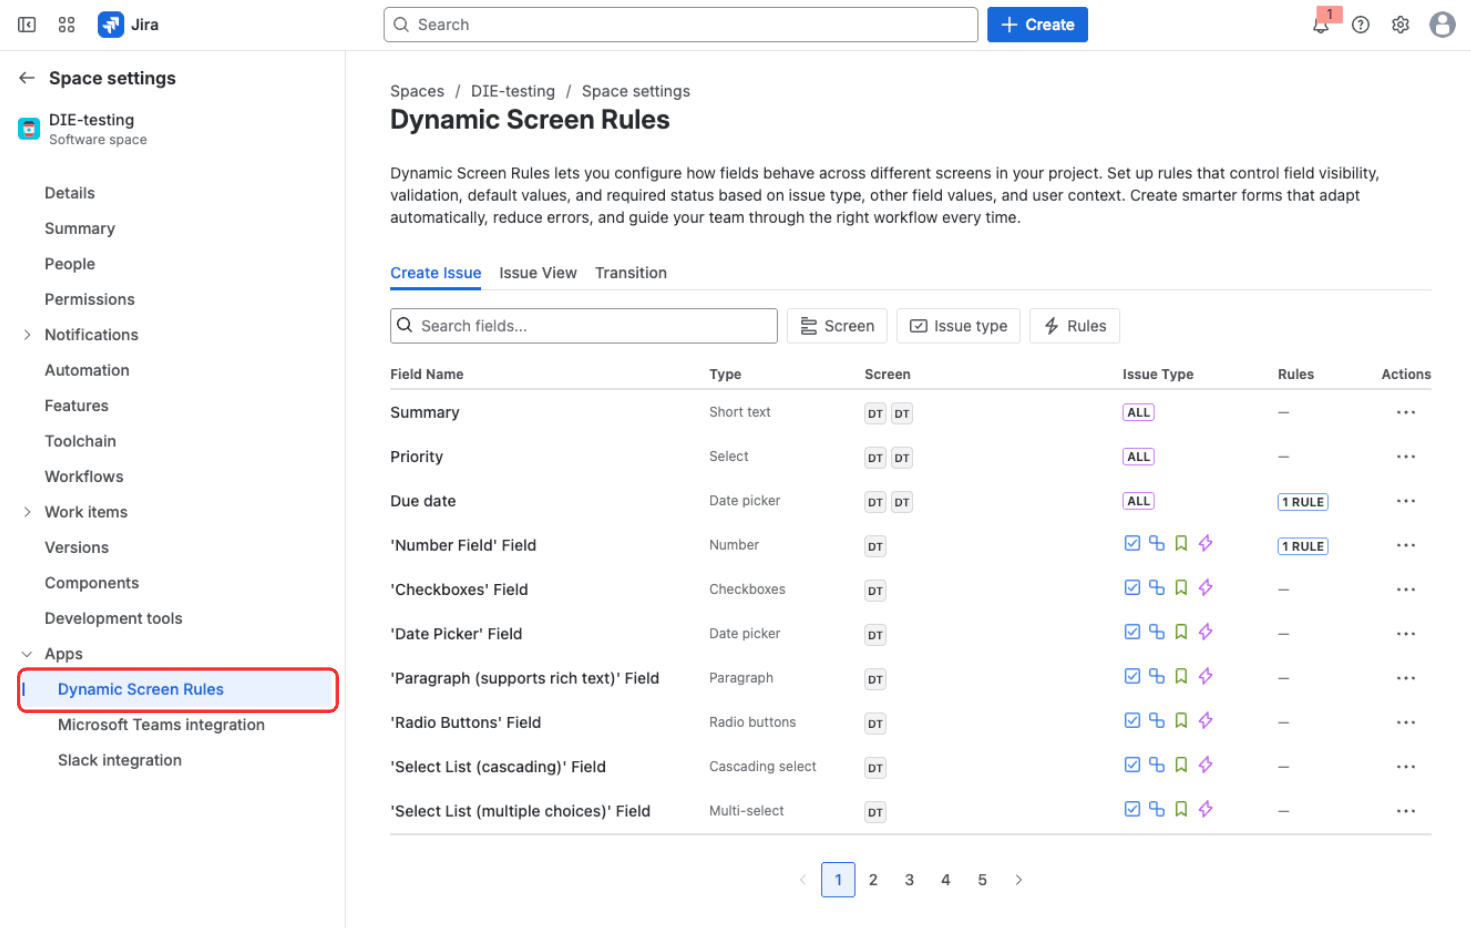
Navigate to Project Settings → Apps → Dynamic Screen Rules
What you'll see: The Dynamic Screen Rules configuration panel opens, showing an empty list (or existing rules if you've created some before).
Start Creating a New Rule
Configure the basic settings to start creating your rule:
-
Screen: Select the appropriate screen where the rule will apply
- Global Issue Create - the create issue dialog
- Issue View - the issue detail page
- Issue Transition - status change dialogs
For this tutorial, select Global Issue Create
-
Target field: Select Root Cause (or whichever field you're using)
- This is the field that will be shown/hidden based on conditions
- Use the search box to find your field quickly
-
Action category: Select the type of action you want to apply
- For this tutorial, select Visibility (Show/Hide Field)
- Other categories include: Required, Lock, Set Value, etc.
-
Click the Add Rule button
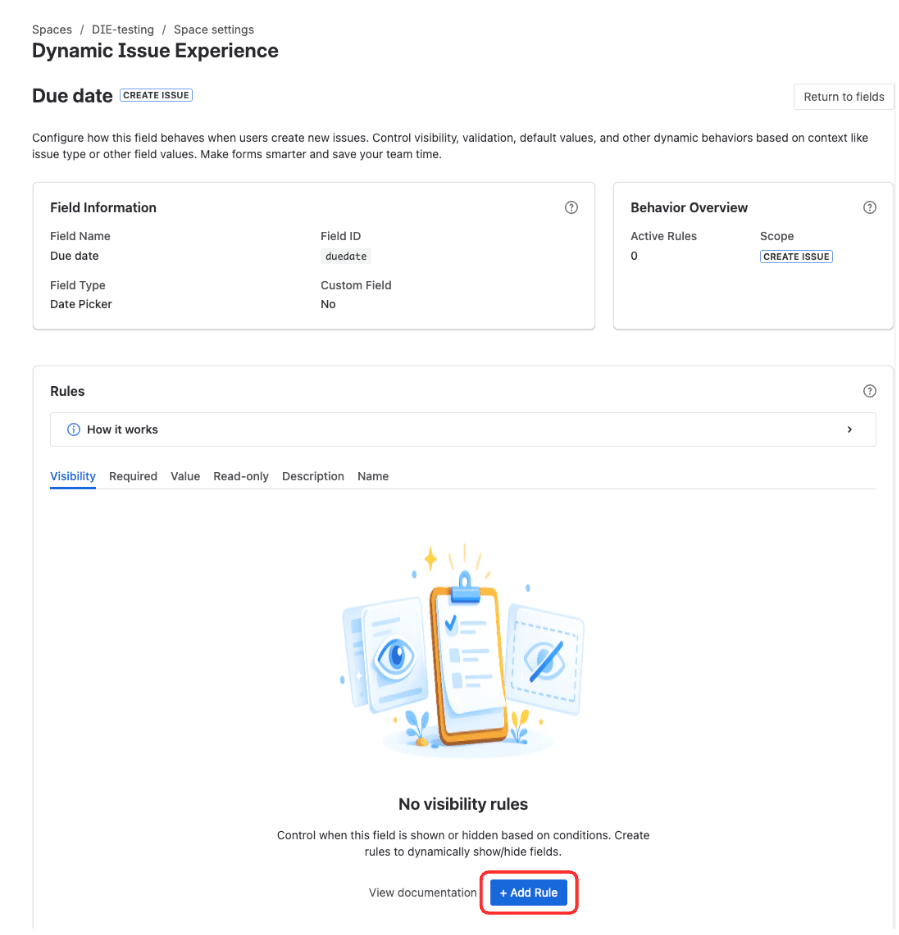
Configure basic settings - Screen, Target Field, Action category, then click Add Rule
What you'll see: A rule creation form appears with sections for scope, action details, and conditions.
infoWhat is a "Screen"? Screens are the three places in Jira where users interact with fields: Global Issue Create (create dialog), Issue View (issue detail page), and Issue Transition (status change dialogs). Learn more in Screens & Contexts.
-
Set the Scope
Define which issue types this rule applies to.
- In the Scope section, find Work type (Issue Type)
- Select Bug from the dropdown or list
- This means the rule will only apply to Bug issues
- Other issue types (Story, Task, etc.) won't be affected
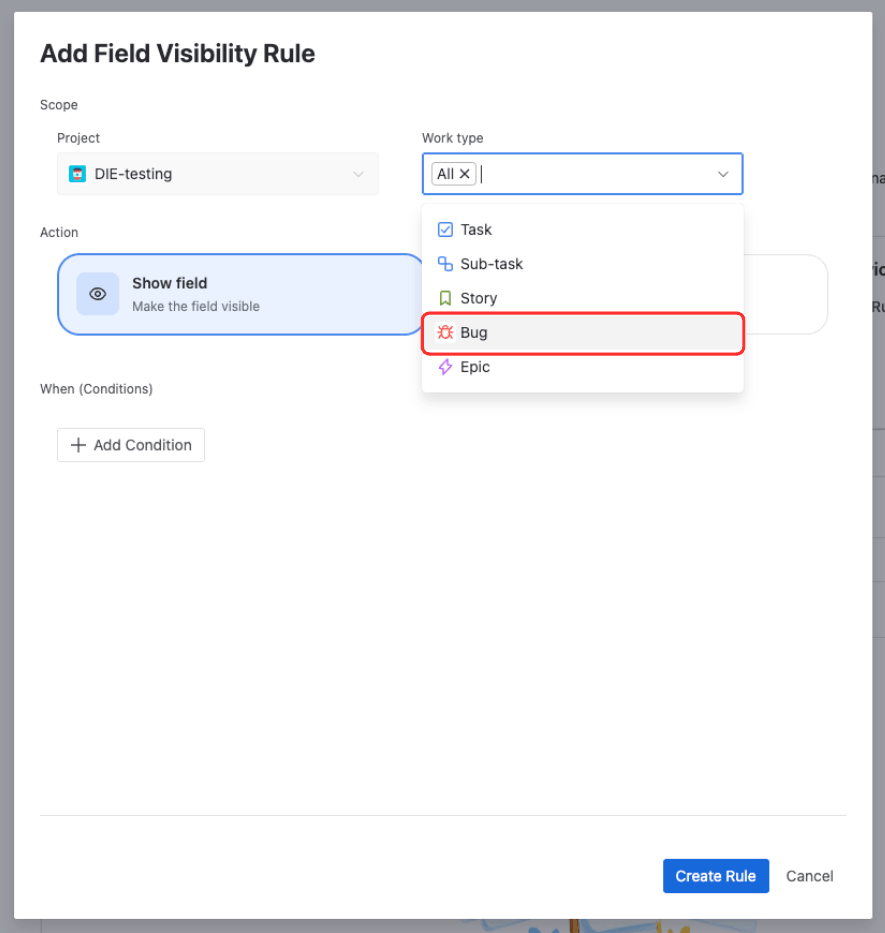
Set the Scope - Select Bug from the Issue Type dropdown
What you'll see: The scope shows "Work type: Bug" or "Issue Type: Bug."
infoScope vs Conditions: Scope filters which issue types the rule applies to. Conditions define when the rule triggers within that scope. Here, we're scoping to Bugs, then adding a condition for Priority.
Define the Action
Specify what happens when conditions are met.
-
In the Actions section, set the specific action:
- Select Show field to make the field visible when conditions are met
- Or select Hide field to hide the field when conditions are met
For this tutorial, select Hide field
-
How it works:
- When conditions are met, the field will be hidden
- When conditions are NOT met, the field will remain visible
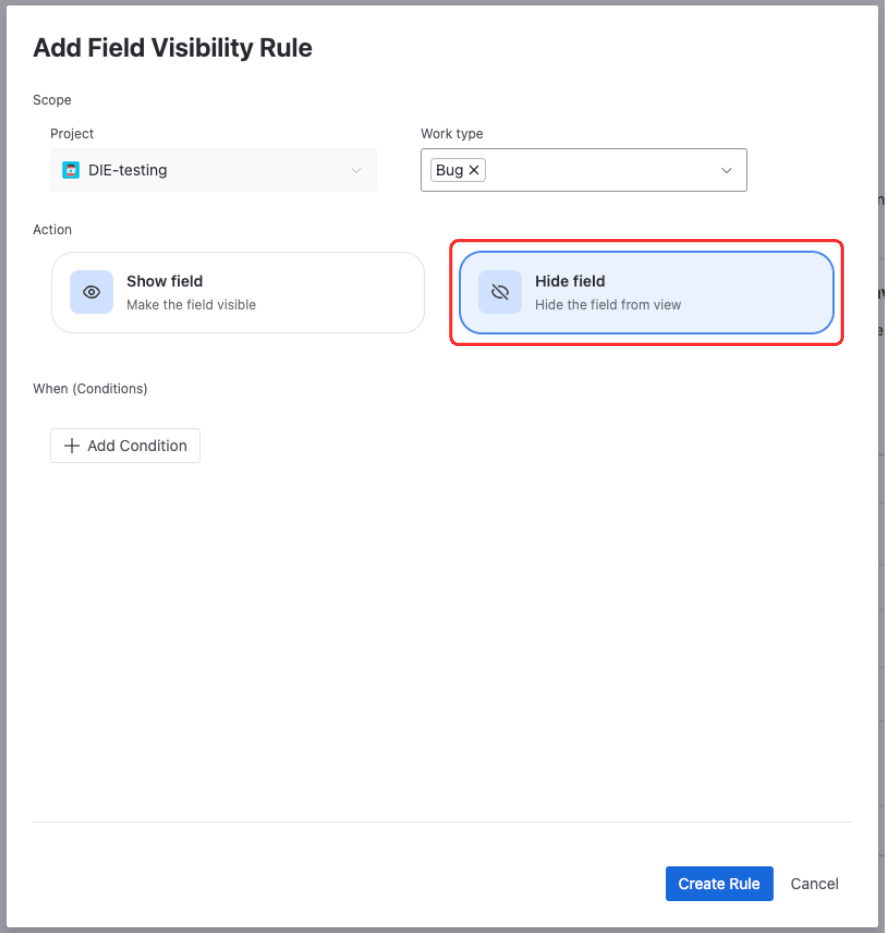
Define the Action - Select Hide field to hide the field when conditions are met
What you'll see: The action section shows "Hide field when conditions are met" or similar text.
-
Add a Condition
Now add the condition that determines when the field should hide.
- Click Add Condition
- Select Field value as the condition type
- Configure the condition:
- Field: Priority
- Operator: Equals
- Value: High
- Click Add or Save to confirm the condition
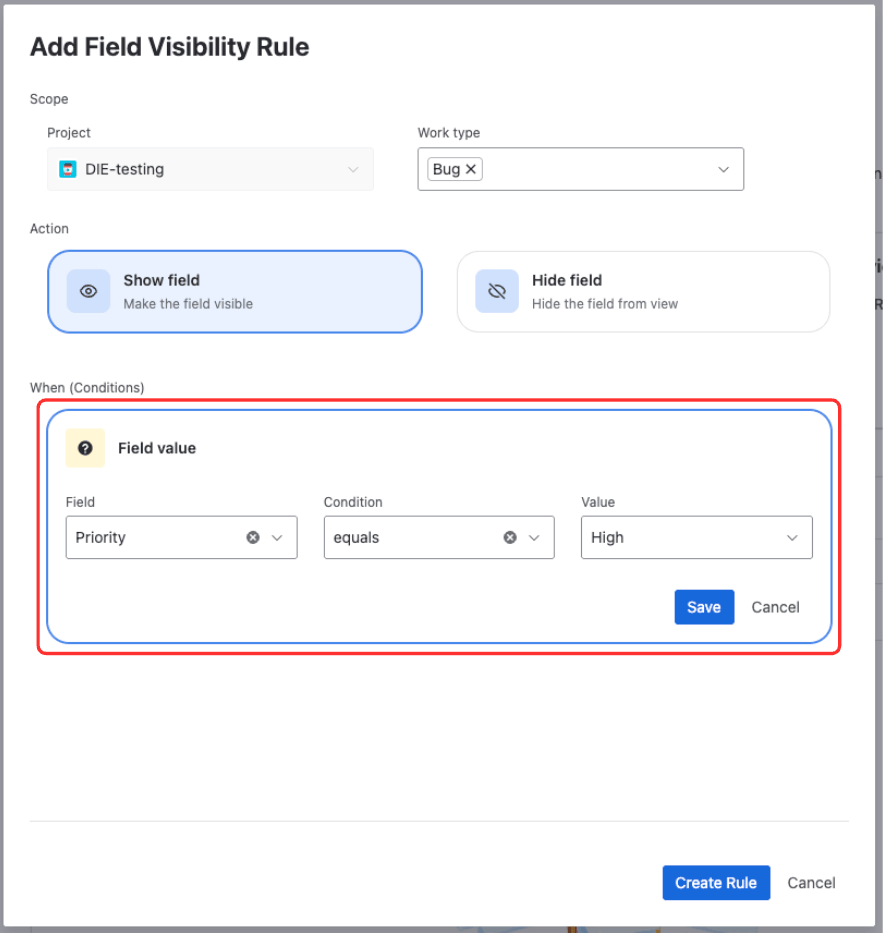
Add a Condition - Configure Field = Priority, Operator = Equals, Value = High
What you'll see: The condition appears showing "Priority equals High."
tipHow it works together: The rule now applies to Bug issues (scope) and triggers when Priority = High (condition). So the Root Cause field will be hidden for Bugs with High priority, but remain visible for lower-priority bugs.
Save the Rule
- Review your rule configuration:
- Screen: Global Issue Create
- Target field: Root Cause
- Scope: Bug issue type
- Condition: Priority equals High
- Action: Hide field
- Click Save or Create Rule at the bottom of the form
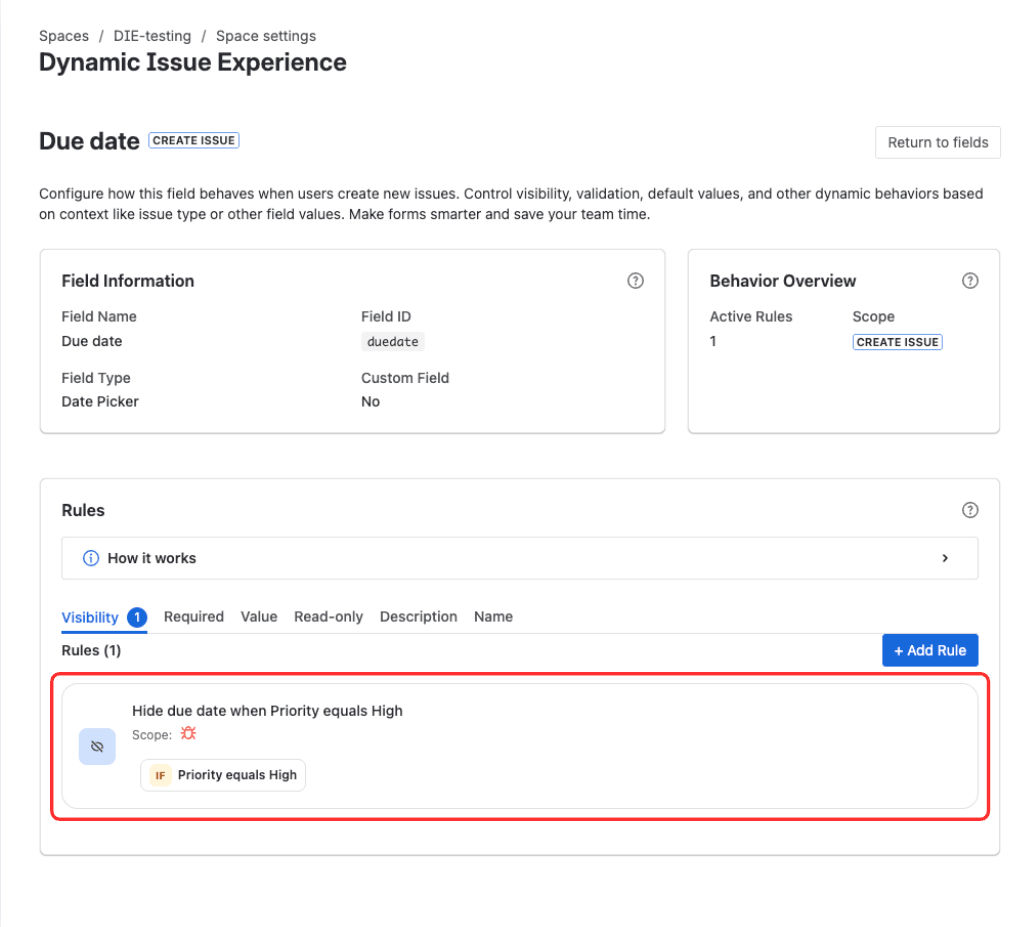
Save the Rule - The saved rule appears in the rules list with an automatically generated name
What you'll see: The rule creation form closes and your new rule appears in the rules list with an automatically generated descriptive name. The rule is enabled by default.
infoRules are enabled by default. Your rule is now active and will affect users creating issues in this project. You can disable it anytime using the toggle switch next to the rule name.
- Review your rule configuration:
Test Your Rule
Now verify that your rule works as expected by creating a test issue.
Test 1: Initial State (Field Should Be Visible)
- Go to your project
- Click Create (or press 'c') to open the create issue dialog
- Select Issue Type: Bug
- Notice the default Priority is set to Medium (or leave it unselected)
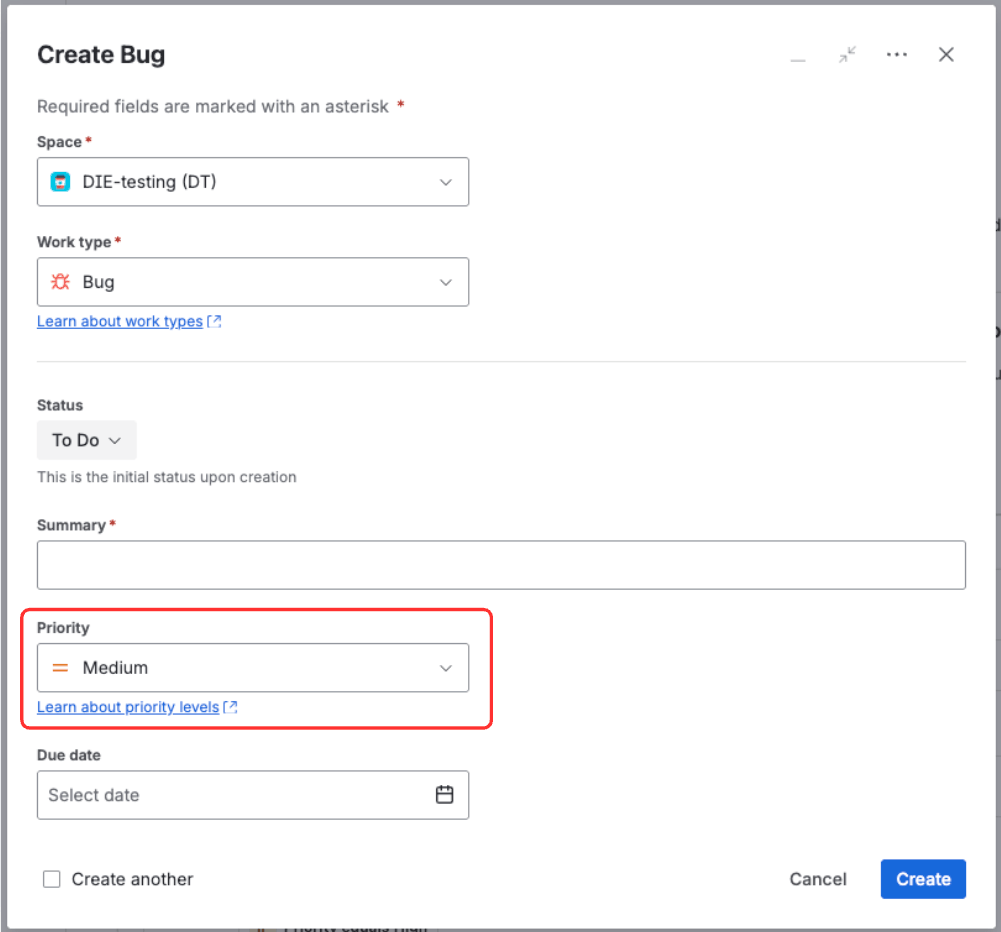
Test 1: Initial state - Root Cause field is visible when Priority is Medium
Expected result: The Root Cause field is visible on the form. You can see it and fill it in because the condition (Priority = High) is NOT met.
Test 2: Change Priority (Field Should Disappear)
- Keep the same create issue dialog open
- Change Priority to High
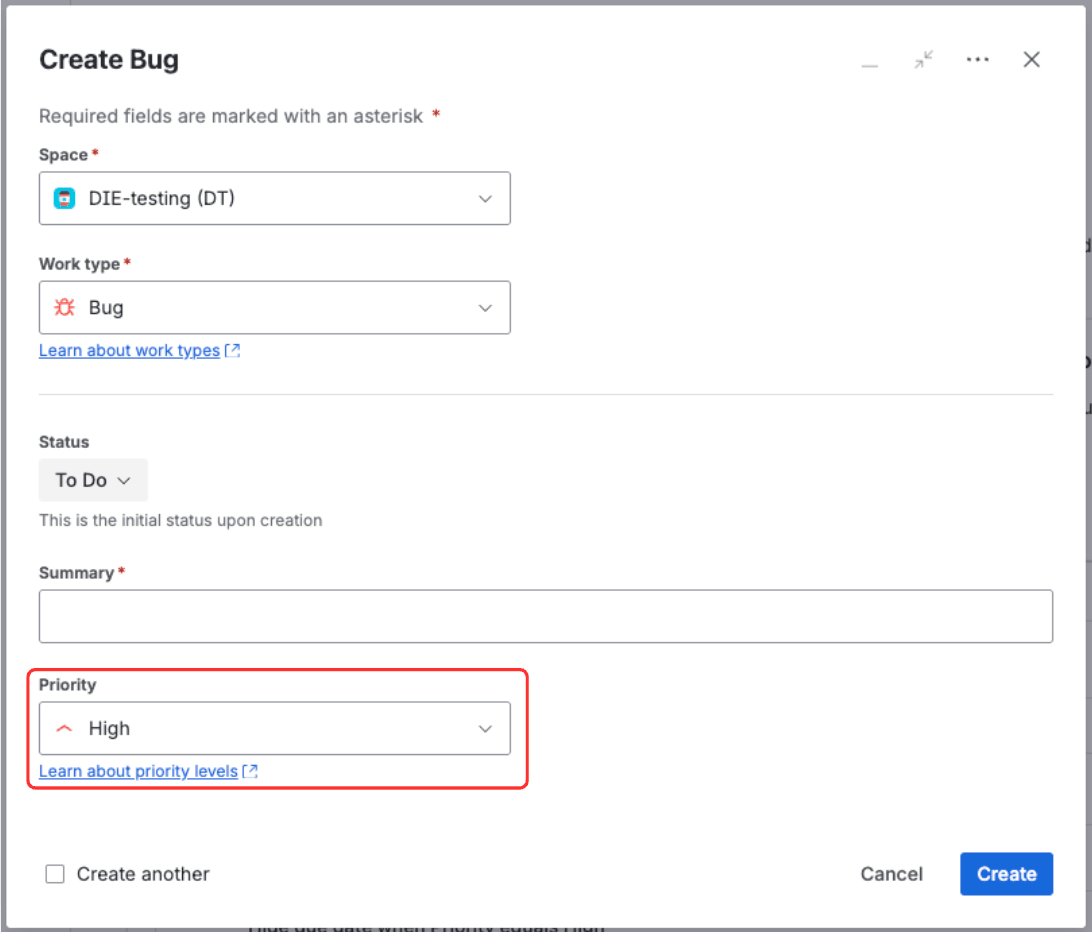
Test 2: After changing priority - Root Cause field is hidden when Priority is High
Expected result: The Root Cause field disappears from the form immediately. It's hidden because the condition is now met (Priority = High).
tipIt works! If the field disappears instantly when you change Priority to High, your rule is working correctly. The form responds in real-time - no page refresh needed. Try switching back to Medium or Low priority, and the field should reappear immediately.
What You've Learned
Congratulations! You've created your first Dynamic Screen Rules rule and learned the fundamental building blocks of rule configuration.
You've Accomplished
| ✅ Configuration Access | Navigated to the Dynamic Screen Rules panel in Project Settings → Apps |
| ✅ Rule Creation | Created a rule with screen selection and target field configuration |
| ✅ Scoping | Limited the rule to specific issue types (Bug issues only) |
| ✅ Conditions | Added field-based condition to trigger when Priority = High |
| ✅ Actions | Defined hide field action that executes when conditions are met |
| ✅ Testing | Verified your rule works correctly with real-time testing |
Common Variations
Now that you understand the basics, try these variations:
- Multiple Priorities
- Required Instead
- Different Screen
- Show Instead of Hide
Hide Field for Multiple Priorities
Want to hide Root Cause for both High AND Critical priorities?
How to do it:
- Add another field-based condition: Priority equals Critical
- Both Priority conditions will have OR relationship (hide if Priority = High OR Priority = Critical)
- The scope (Bug issue type) still applies - rule only works for Bugs
Result: Root Cause will be hidden when Priority is either High OR Critical, giving you more control over when detailed analysis is needed.
Multiple conditions of the same type automatically use OR logic - no complex configuration needed!
Make the Field Required Instead
Want to require Root Cause instead of just hiding it?
How to do it:
- Edit your rule
- Change the action from "Show/Hide Field" to "Make Field Required"
- Same conditions, different action
Result: Root Cause will be marked as required (red asterisk) when Priority is High, forcing users to fill it before creating the issue.
When to use this: When you want to ensure data completeness rather than just revealing optional fields.
Apply to Issue View Instead
Want the same behavior on the issue detail page?
How to do it:
- Create a new rule (or duplicate this one)
- Select Screen: Issue View
- Same conditions and action
Result: The Root Cause field will also hide on the issue view page when Priority is High, maintaining consistency across screens.
Tip: You can create similar rules for different screens to provide consistent field behavior throughout the issue lifecycle.
Show Field Instead of Hiding
Want to show the field only when Priority is High (instead of hiding it)?
How to do it:
- Edit your rule
- Change the action from "Hide field" to "Show field"
- Same conditions
Result: Root Cause will only be visible when Priority is High. It will be hidden for all other priorities (Low, Medium, Critical).
When to use this: When fields should only appear in specific, narrow conditions rather than being visible by default.
Troubleshooting
"The field doesn't hide even when conditions are met"
Possible causes:
- The field isn't added to the screen in Jira's screen configuration
- You're testing in a different project (rules are per-project)
- The rule is disabled (check the toggle switch)
- The action is configured incorrectly (should be "Hide field")
Solution:
- Verify the field is on the screen: Project Settings → Screens
- Verify you're in the correct project
- Check that the rule is enabled in Dynamic Screen Rules config
- Verify the action is set to "Hide field" not "Show field"
"The field hides but doesn't show when I change values"
Possible causes:
- Browser cache issue
- Conditions are configured incorrectly
Solution:
- Refresh the page and try again
- Review the conditions in the rule configuration
- Check that you're testing the right combination (when conditions are NOT met, field should be visible)
"I can't find the Dynamic Screen Rules in Project Settings"
Possible causes:
- The app isn't installed
- You don't have Project Administrator permissions
Solution:
- Verify installation: Jira Settings → Apps → Manage apps
- Ask your Jira admin for Project Administrator access
Next Steps
Now that you've created your first rule, choose your learning path:
- Learn the Fundamentals - Understand core concepts like rules, screens, conditions, actions, and real-time execution
- Master All Actions - Explore all 7 action types: show/hide, required, lock, set value, change labels, limit options, and more
- Advanced Conditions - Master field-based, context-based, and user-based conditions
- Use Cases & Examples - Ready-to-use configurations for common scenarios
- Field Validations - Enforce data quality with 15 validation types