Jira Subtask Templates: How to Standardize Child Issues in 2026
Most teams have a handful of issue types where the subtasks follow a pattern — a QA review on every feature story, a security checklist on critical bugs, a set of onboarding tasks for each new hire ticket. Creating those subtasks manually each time is slow and error-prone. Jira subtask templates let you standardize that process, but there are three different ways to set up a Jira subtask template, and each fits a different workflow. This guide helps you pick the right one.
Quick answer
- Jira Automation — auto-creates subtasks on every new issue. Free, no-code, built into Jira. You can set different fields per subtask, but managing complex templates across many issue types gets unwieldy.
- Templify Apply Template — applies a hierarchy template to any existing issue, creating a full subtask set in one action. Templates are managed centrally and reusable across projects. Works manually (Actions → Apply Template) or automatically via Jira Automation action.
- ScriptRunner — creates subtasks programmatically with conditional logic. Powerful, but requires Groovy coding and maintenance.
Which approach do you need?
| Your scenario | Best approach |
|---|---|
| Every new Story/Bug should get subtasks automatically and the setup is straightforward | Jira Automation |
| You need subtask sets that are easy to manage, reusable across projects, and can be applied to existing issues | Templify Apply Template |
| Subtask sets should vary based on conditions (priority, component, custom logic) | ScriptRunner |
Approach 1 — Jira Automation (native)
Jira Automation is the simplest starting point — it is built into Jira Cloud, free on all plans, and requires no coding. You can set different field values per subtask in the branch rule configuration.
Open Automation
Go to Project Settings → Automation → Create rule. You need project admin permissions.
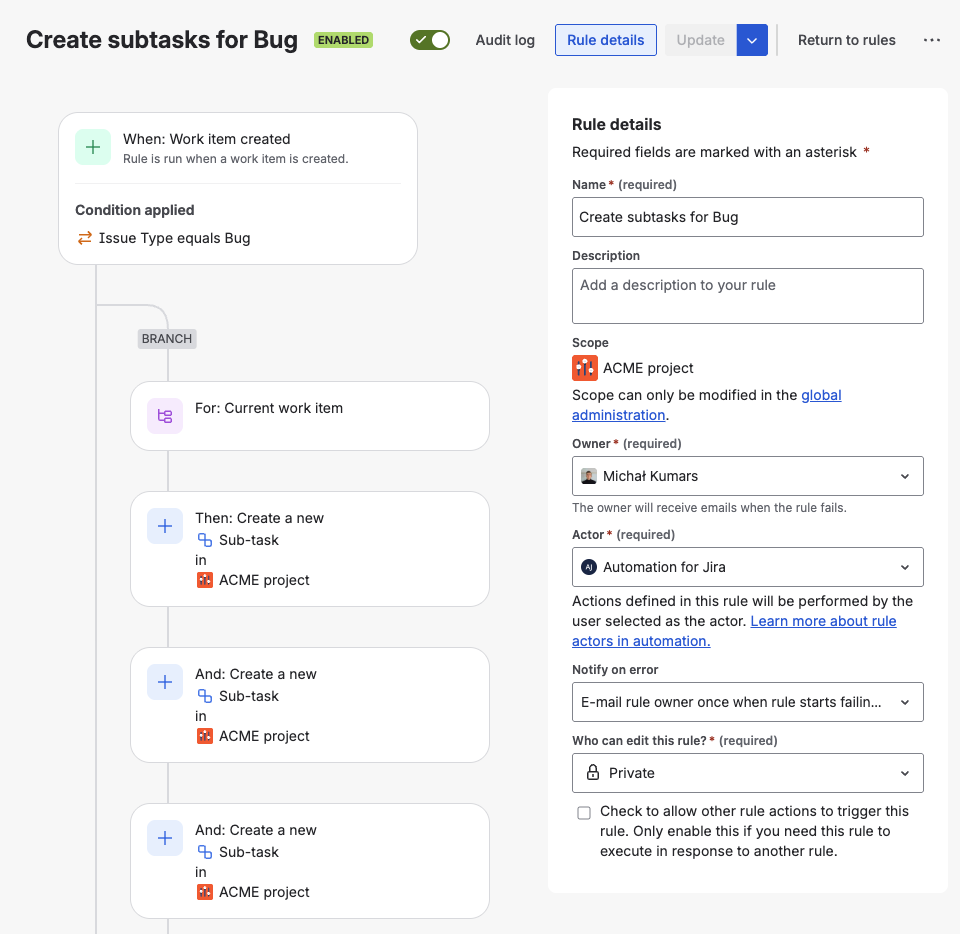
Set the trigger
Choose Work item created as the trigger. Add a condition: Issue type = Story (or Bug, Task — whichever type needs subtasks).
Add a branch rule with subtask creation
Add action Create sub-tasks. This is a branch rule — define each subtask summary in the list:
DesignDevelopTestDocument
All subtasks inherit the parent's project and will be created with your project's default field values.
Enable and test
Name the rule (e.g., "Auto-create Story subtasks"), enable it, and create a Story to verify the subtasks appear.
Limitations to know
- Hard to manage at scale. Each issue type needs its own Automation rule. With 10+ issue types and different subtask sets, you end up with a web of rules that are hard to maintain, easy to break, and impossible to reuse across projects.
- Cannot apply to existing issues. Automation rules only fire on triggers — you cannot retroactively add a subtask set to an issue that was created before the rule existed.
- Descriptions are plain text only — no rich formatting, no dynamic variables beyond basic smart values like
{{issue.reporter}}. - No central template management. Changes require editing individual Automation rules per project. There is no single place to update a subtask set and have it apply everywhere.
Approach 2 — Templify Apply Template
This approach solves the main pain points of native Automation: subtask templates are managed centrally, reusable across projects, and can be applied to issues that already exist — not just on creation triggers. And it works both manually and automatically.
How it works
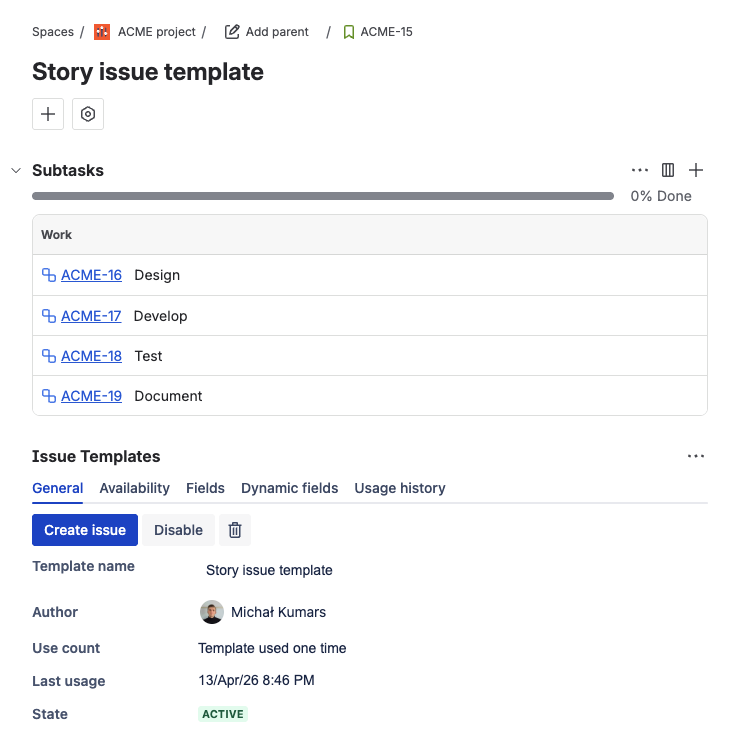
You create a hierarchy template in Templify: a root issue (Story, Bug, Task — any type) with subtask children. Each subtask in the template has its own field defaults. Then you apply that template to an existing issue — the subtasks are created as children of that issue, each with their individual fields.
The root issue in the template acts as a blueprint carrier. Since you're applying it to an issue that already exists, you don't want the template to overwrite the parent's fields. To handle this, open the template issue, go to the Fields section under Issue Template, and uncheck any fields you want to skip — like summary, description, or priority. Only the subtask children will be created; the parent issue keeps its existing values.
Before breaking work into subtasks, make sure the parent story follows a consistent format. The Jira user story template gives you a copy-paste ready As a / I want structure with Acceptance Criteria built in.
Manual: Actions → Apply Template
Create an issue template with hierarchy
Create an issue template with the desired issue type as the root. Add subtask children — each with its own summary, description, assignee, labels, and story points. On the root issue, open Fields in the Issue Template section and uncheck any fields you don't want applied to the parent (typically: summary, description, priority, status).
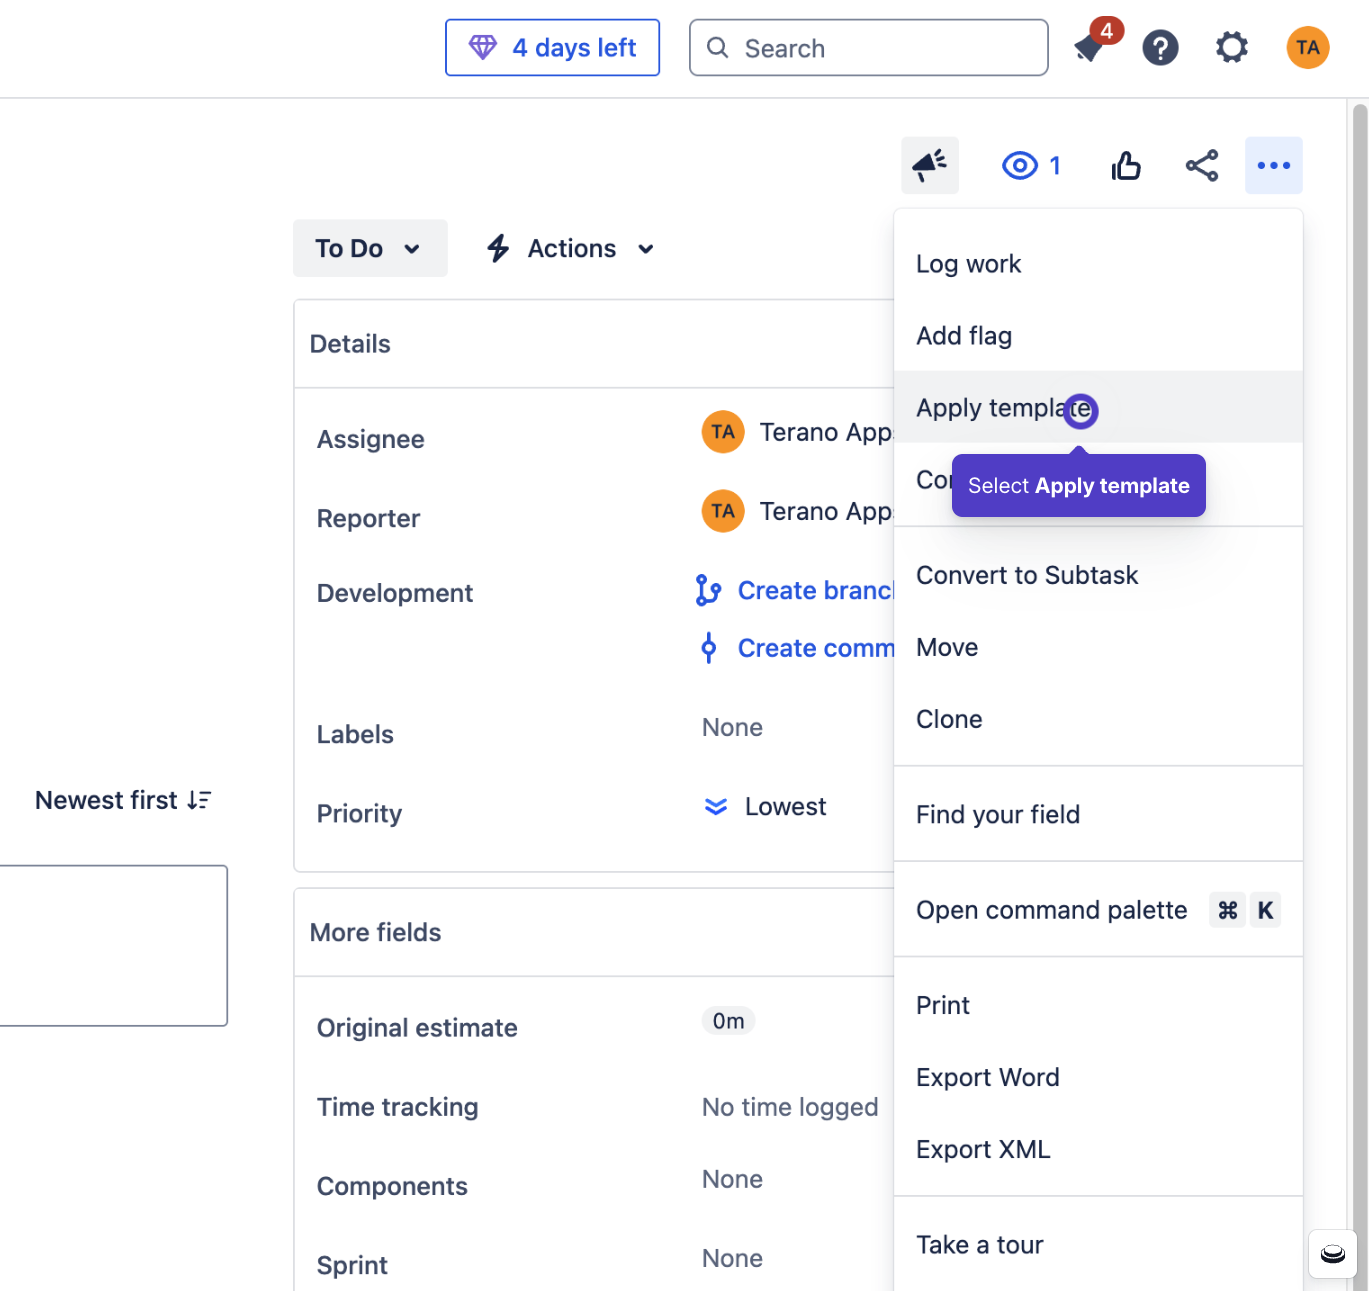
Open any existing issue
Navigate to the Jira issue that needs subtasks.
Apply the template
Click the ⋯ Actions menu in the top-right corner → Apply Template → select your hierarchy template → click Apply. The subtasks are created immediately as children of the current issue, each with their pre-configured fields.
Automatic: Jira Automation + Apply Template action
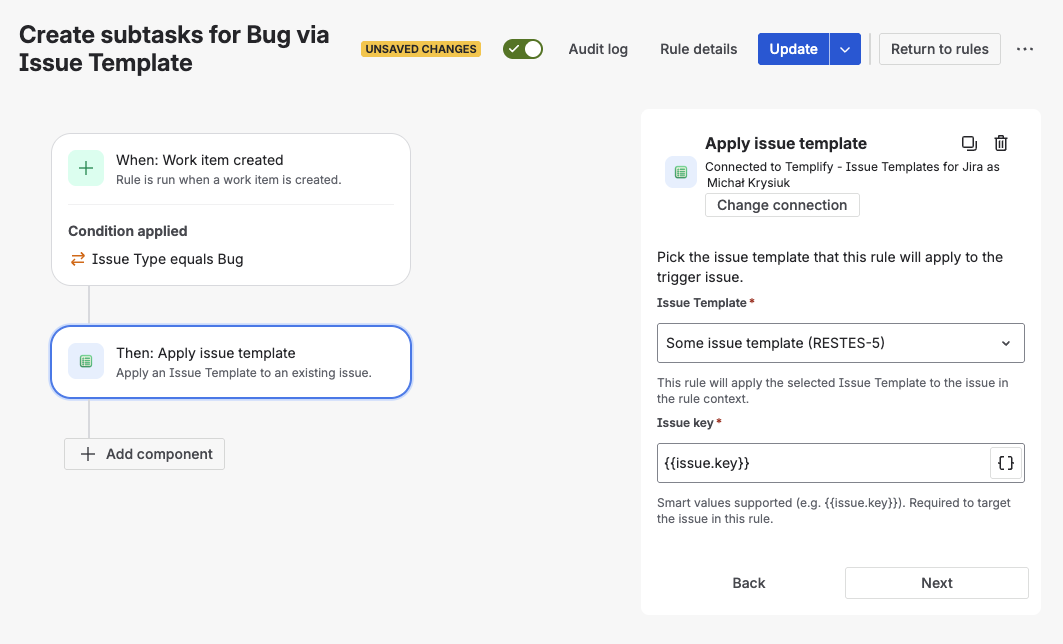
Templify provides a native Apply Template action for Jira Automation. This means you can combine the trigger logic of Jira Automation with the field control of Templify templates:
- Create an Automation rule with trigger Work item created (or any other trigger)
- Add action Apply Template (from Templify)
- Select your hierarchy template
- The template's subtasks are created automatically — each with individual fields
This gives you the best of both approaches: automatic creation like native Automation, but with different fields per subtask like a template app.
When this approach wins
- Central template management. Define a subtask set once, use it across every project. Update the template — every future use reflects the change. No per-project Automation rules to maintain.
- Works on existing issues. Apply a template to issues that were already created — manually, from imports, or from other integrations. Automation can only fire on triggers.
- Manual or automatic. Use Actions → Apply Template for on-demand use, or wire it into Jira Automation for fully automatic subtask creation.
- Skip parent fields. Control which root fields are applied and which are ignored, so the existing issue's data stays intact.
- Dynamic field values. Use expressions for current user, dates, or custom text in subtask fields — richer than Automation's basic smart values.
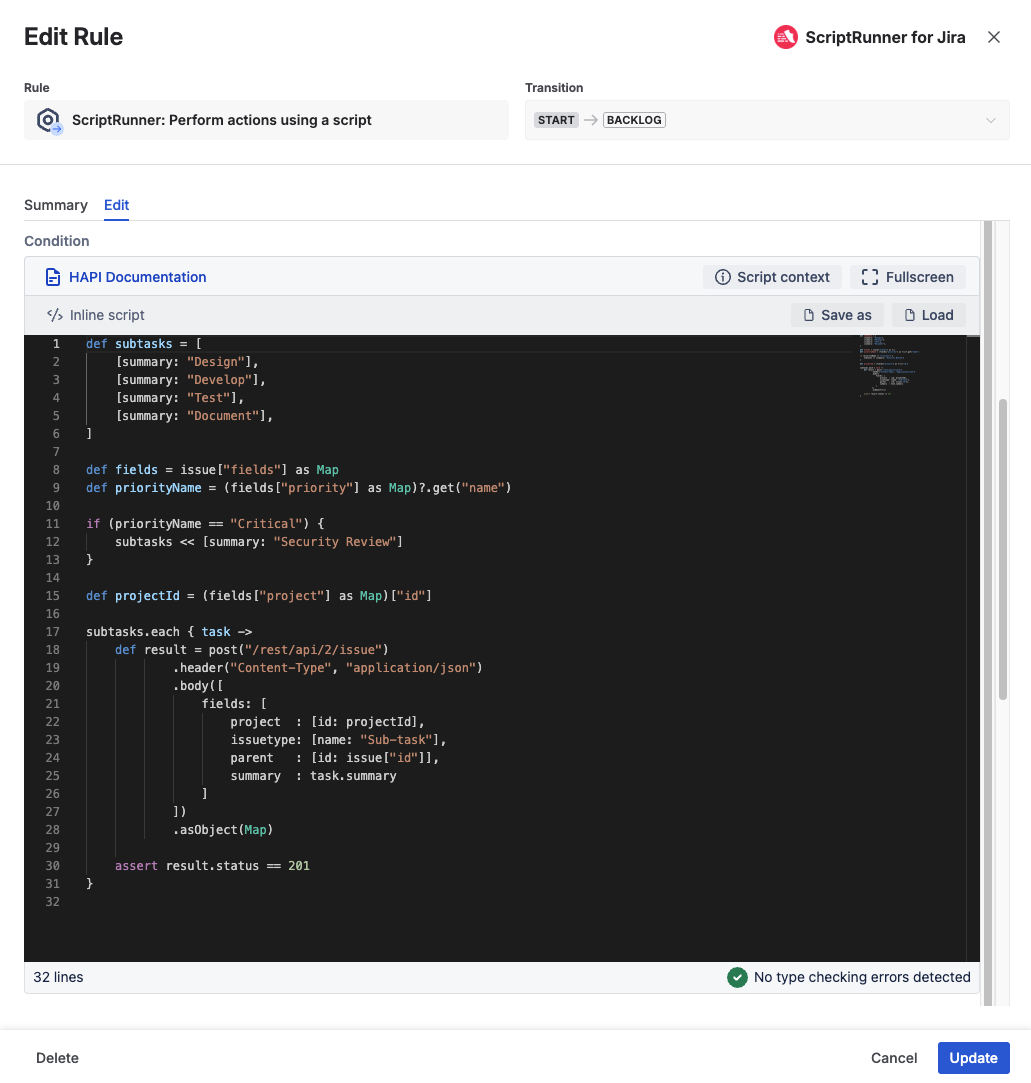
Approach 3 — ScriptRunner post-functions
ScriptRunner lets you create subtasks programmatically using Groovy scripts attached to workflow transitions. This is the most powerful option — and the most complex.
When ScriptRunner makes sense: You need conditional subtask creation. For example: Bugs with priority = Critical get an extra "Security Review" subtask that normal Bugs don't get. Or: issues in the "Platform" component get different subtasks than issues in "Frontend."
Trade-off
ScriptRunner requires Groovy coding, a separate Marketplace subscription, and ongoing maintenance when Jira APIs change. If your subtask sets are static (the same every time), Automation or Apply Template is simpler and cheaper. Reserve ScriptRunner for cases where conditional logic is genuinely required.
Side-by-side comparison
| Automation (native) | Templify Apply Template | ScriptRunner | |
|---|---|---|---|
| Setup | Easy | Easy | Hard |
| Auto-create on new issue | Yes | Yes (via Automation action) | Yes |
| Apply to existing issues | No | Yes | No |
| Different fields per subtask | Yes | Yes | Yes |
| No-code | Yes | Yes | No |
| Dynamic field values | Limited | Yes | Yes |
| Skip parent fields | N/A | Yes | Yes |
| Reusable across projects | No (per-project rules) | Yes (central templates) | No |
| Conditional logic | Basic | No | Full |
| Cost | Free | Marketplace app | Marketplace app |
Bottom line: Start with Jira Automation if you have a simple setup — a few issue types, one project. Move to Templify Apply Template when you need central template management across projects, the ability to apply subtask sets to existing issues, or richer dynamic fields. Reach for ScriptRunner only when you need conditional logic that the other approaches cannot express.
FAQ
Can you create subtask templates in Jira?
Yes — three ways: native Jira Automation's "Create sub-tasks" action, Templify Apply Template (central hierarchy templates reusable across projects), or ScriptRunner Groovy scripts attached to workflow transitions.
How do I auto-create subtasks when an issue is created in Jira?
Create a Jira Automation rule with trigger "Work item created", add a condition for the issue type, then add the "Create sub-tasks" action. For richer templates with individual fields per subtask, use Templify's Apply Template automation action instead — it pulls from a centrally managed template.
Can I add subtasks to an existing Jira issue from a template?
Not with native Automation — it only fires on triggers. Use Templify's Apply Template: open the issue → Actions menu → Apply Template → select your hierarchy template. The subtasks are created immediately as children of the current issue.
What is the difference between Jira Automation subtasks and Templify Apply Template?
Jira Automation creates subtasks on a trigger (e.g., issue created) and requires a separate rule per project. Templify templates are managed centrally, reusable across projects, can be applied to existing issues, and support richer dynamic field values per subtask.
Related reads
- Jira Epic Templates: Create Project Hierarchies Automatically — full hierarchy generation with one click
- How to Create Issue Templates in Jira Cloud (Step-by-Step) — choosing between Automation, Clone, and template apps
- Jira Automation Issue Templates: Epic–Task Workflows — native rule chaining patterns
- Jira Bug Report Template: Best Practices — structured bug reports with subtask checklists
Start building subtask templates
Create a hierarchy template with individual fields per subtask — then apply it manually or wire it into Jira Automation for fully automatic creation.
Try Templify free on Marketplace