How to Recover Deleted Jira Issues: Fields, Comments, Worklogs, and Subtasks
Someone deletes the wrong issue. An automation rule runs against a bad filter. A bulk cleanup catches two real issues in the selection. The data is gone — but if deletion tracking was enabled before the incident, every field, comment, worklog, and subtask can be recovered in under a minute.
Quick answer
- Jira Cloud has no built-in recovery — deleted issues are permanently removed with all content.
- With Basic tracking, core fields are captured from the deletion event. With Extended tracking, comments, worklogs, custom fields, and links are continuously synced — so the full snapshot is already available when deletion occurs.
- Open the Deleted Issues panel → find the record → click Restore → select what to include → done.
- Bulk recovery works the same way: filter by date and user, select all, restore in one batch.
What you will learn
- Why Jira Cloud cannot recover deleted issues natively — and what the actual recovery gap is.
- The two prerequisites for any successful recovery.
- Step-by-step: recover a single deleted issue from snapshot to live Jira issue.
- Step-by-step: bulk recovery after a mass deletion incident.
- How Basic and Extended tracking profiles determine what data is available for restore.
Why recovery is harder than it should be
Jira Cloud performs a hard delete. When an issue is removed, Jira destroys the issue and everything inside it — fields, description, comments, worklogs, attachments, issue links, and subtasks. There is no trash, no recycle bin, and no grace period.
Site-level backups exist, but they are all-or-nothing. Restoring a backup overwrites the entire Jira instance to a previous point in time — there is no way to surgically restore a single issue from a backup without reverting every change made since.
Atlassian Support cannot recover individual issues either. The audit log records that a deletion happened, but stores nothing about what was deleted. We covered the full deletion mechanics in What Happens When You Delete a Jira Issue — and Why There Is No Undo.
No retroactive recovery
If tracking was not enabled for a project when a deletion occurred, the data was not captured. Recovery requires preparation — it cannot be done after the fact. The only path to issue-level recovery is pre-deletion capture.
The two things you need for issue recovery
Two prerequisites for recovery
1. Pre-deletion tracking. Restorify must be tracking the project before the deletion happens. With Basic profile, the app captures core issue fields from the deletion event itself — this works instantly for every issue in the project. With Extended profile, the app continuously listens for all change events (field updates, new comments, worklogs, links) and maintains an up-to-date copy — so when a deletion occurs, the full snapshot including comments, worklogs, custom fields, and links is already available. No tracking = no snapshot = no recovery.
2. Selective restore controls. Once a snapshot exists, you choose what to bring back. Comments, worklogs, issue links, and subtasks are all optional — restore everything or just the core fields.
Selective
Restore
Step-by-step: recover a single deleted issue
Open the Deleted Issues panel
Go to Jira admin settings → Restore Deleted Issues. The Deleted Issues tab opens showing all captured deletions, sorted newest first.
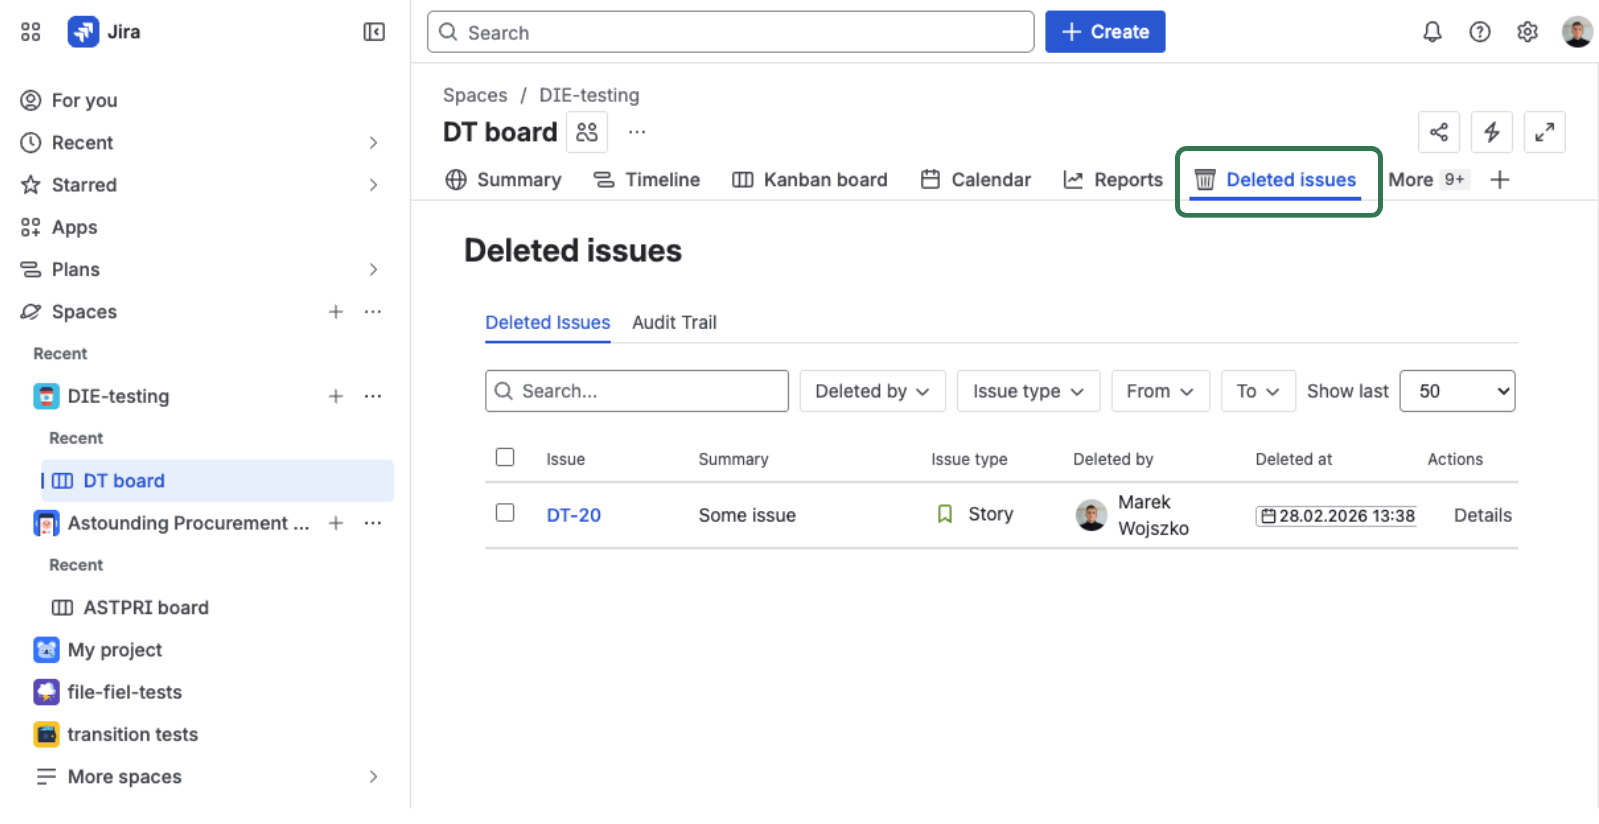
Each row shows the issue key, summary, issue type, who deleted it, and when. This is your starting point for any recovery.
See Browse Deleted Issues for the full panel reference.
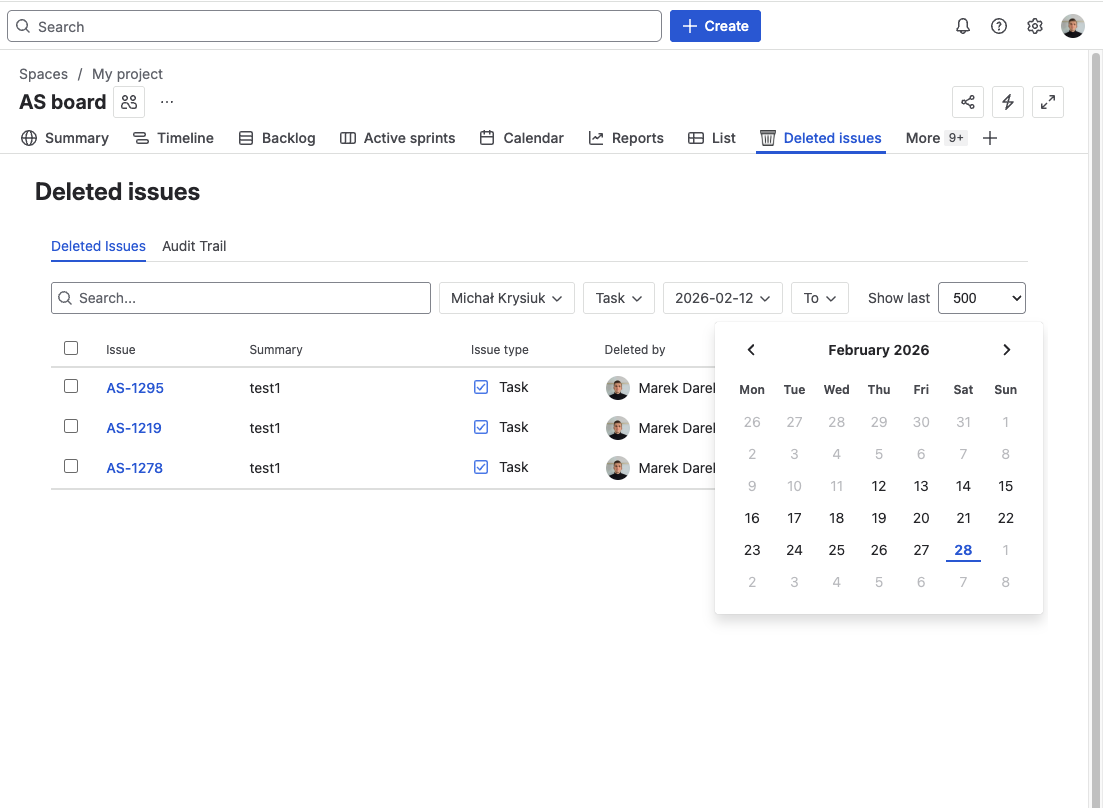
Find the issue using filters
Use the filter bar above the list to narrow results. You can combine any number of filters simultaneously:
- Deleted by — the user or automation account that performed the deletion
- Issue type — Bug, Story, Task, Epic…
- Date range — narrow to a time window around the incident
- Keyword — search by issue key or summary text
For example: filter to "Bug" + "last 7 days" + "deleted by Alex Morgan" to isolate a specific accidental deletion.
Review the full snapshot
Click the row to open the detail view. Everything the app had tracked up to the point of deletion is shown:
- Deletion Details — who deleted it, when, retention expiry countdown
- Issue Fields — summary, description, status, priority, labels, components, all custom fields
- Comments — full text with author and timestamp (Extended profile)
- Worklogs — duration, author, date (Extended profile)
- Issue links — type and direction (Extended profile)
- Subtasks — key, summary, status (Extended profile)
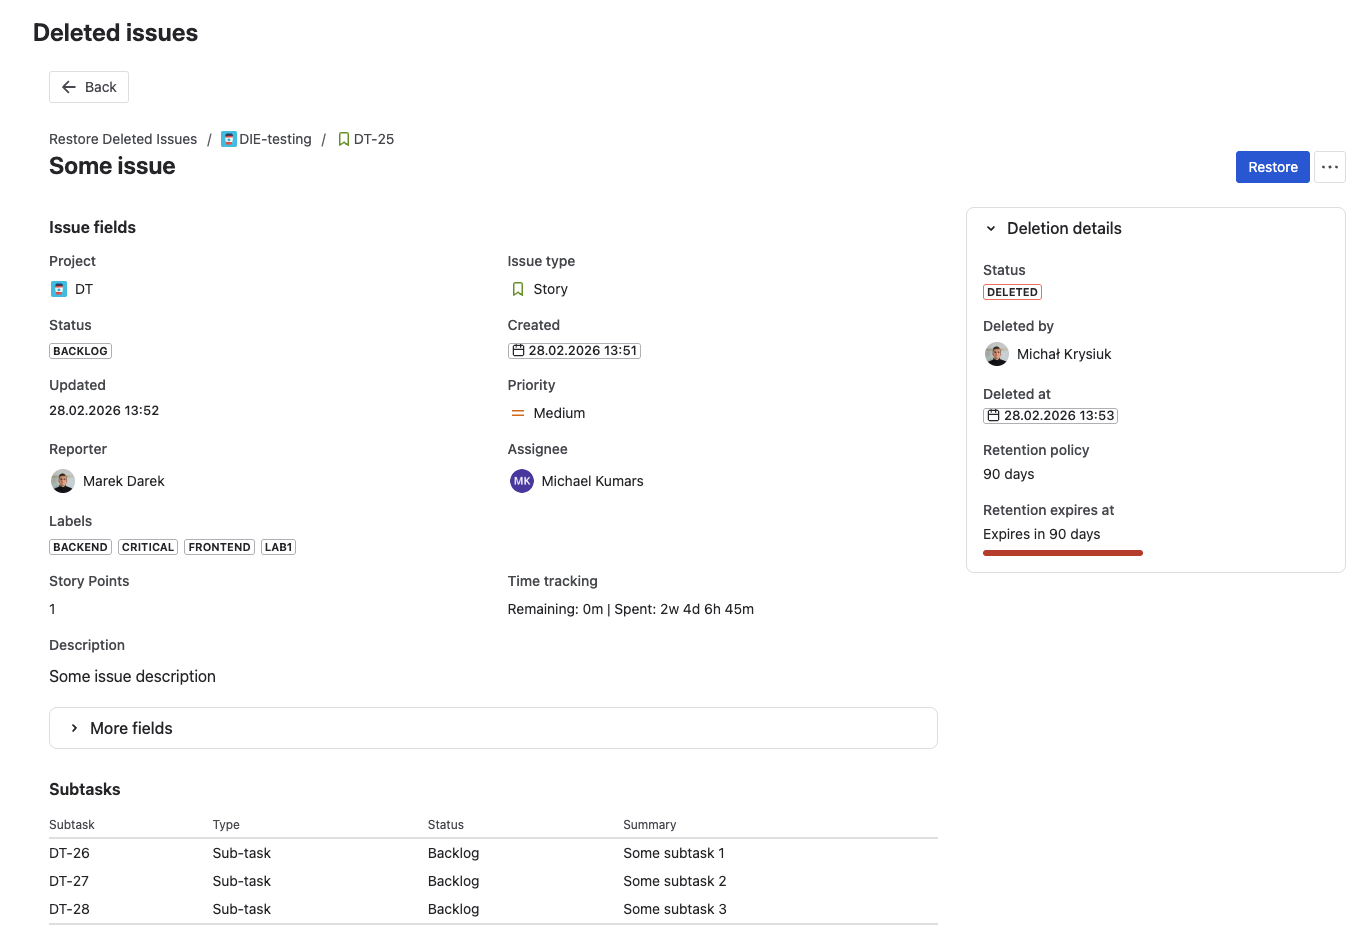
What you see in the detail view is exactly what the restore will recreate.
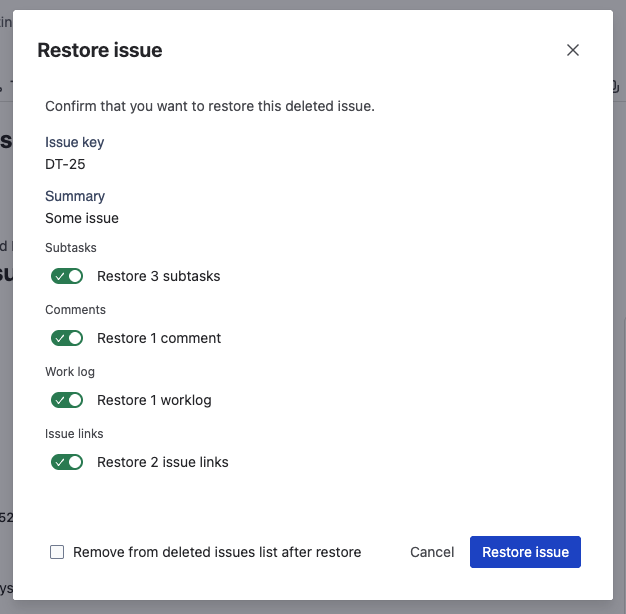
Click Restore and choose what to include
Click Restore in the detail view header. The restore options modal opens with checkboxes:
- Comments — all comments with original author attribution. Each comment includes a note — "Originally by [display name] on [date]" — so authorship context is preserved even though the comment appears under the restoring user's account.
- Worklogs — every time log entry with duration, author, and date. Critical for billing-sensitive projects where logged time represents revenue or contractual obligations.
- Issue links — link type (blocks, relates to, is caused by) and direction maintained. If the target issue still exists, the link is recreated. If the target was also deleted, the link is recorded but cannot be reconnected.
- Subtasks — each subtask recreated as a child issue with its own fields, status, and priority.
- Remove record after restore — deletes the snapshot from the app on success.
If you only need the core issue fields, deselect everything else for a faster restore.
Confirm and verify the result
Click confirm. The result modal shows one of three outcomes:
- Success ✅ — issue created, all selected content restored
- Partial ⚠️ — issue created, but some content couldn't be restored (e.g., a linked issue was also deleted, a comment author's account was deactivated)
- Failed ❌ — issue not created (project no longer exists, issue type unavailable, no Create Issue permission)
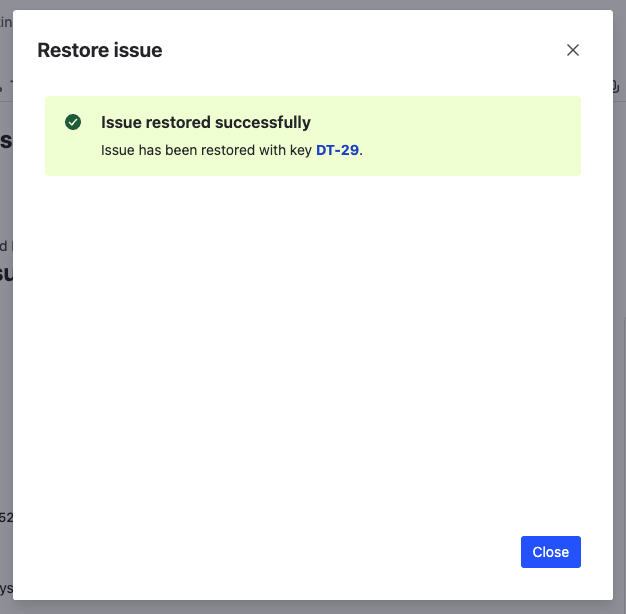
The restored issue receives a new key (e.g., PROJ-456 instead of PROJ-247). Jira does not allow reusing keys from deleted issues. Click the new key to open it in Jira and verify the result.
The original key is preserved in the snapshot metadata for reference.
Step-by-step: recover multiple issues after a bulk deletion
Filter to isolate the incident
Set a narrow Date range around the incident window and filter by Deleted by — the user or automation account that caused the mass deletion. This separates the incident records from routine deletions in the list.
Select all affected records
Check individual rows or use the header checkbox to select all filtered results. The bulk action toolbar appears showing the selected count.
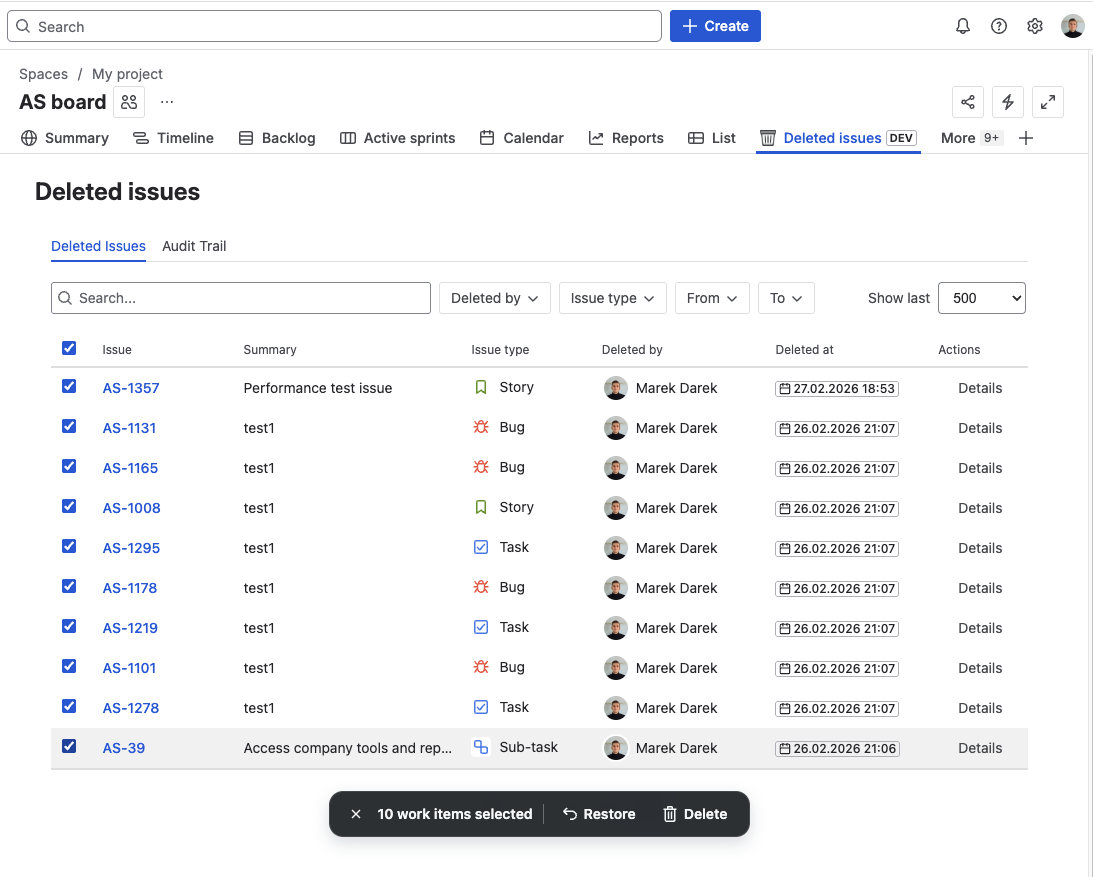
Click Bulk Restore and configure
Click Restore in the toolbar. The restore options modal applies to all selected records equally — Comments, Worklogs, Issue links, Subtasks, and Remove record after restore.
If different issues need different restore options, restore them individually instead. Issues are restored sequentially — a failure on one does not stop the batch.
See Bulk Restore for the full reference.
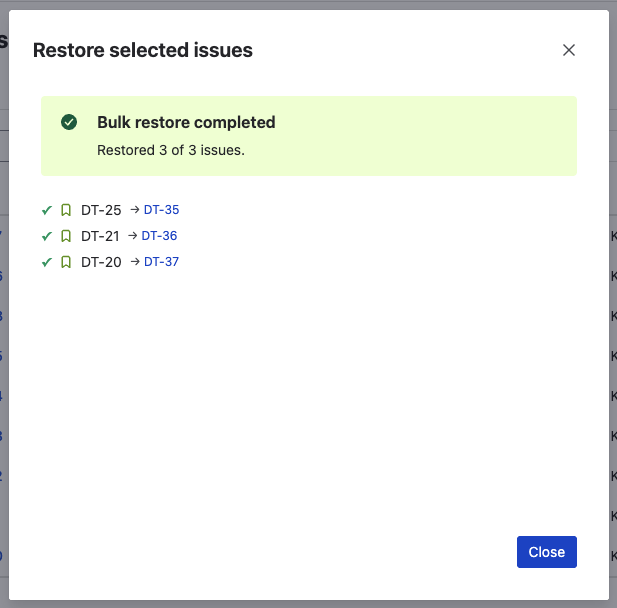
Review the batch result
After the batch completes, the result summary shows:
- Requested — total number of issues selected
- Succeeded — issues fully restored as requested
- Partial — issues created but with some content missing
- Failed — issues that could not be created
The result also lists the new Jira issue keys for all successfully created issues. Individual failures are listed with their reasons, so you can address them separately — for example, by creating the missing project first and then re-restoring the failed record individually.
What happens after restore
-
New issue key assigned — Jira does not allow reusing keys from deleted issues. If the original was PROJ-247, the restored issue might be PROJ-456. The original key is preserved in the snapshot metadata for reference.
-
All restored content is live in Jira — comments appear in the activity feed, worklogs count toward time tracking, issue links are active, subtasks show on the board.
-
Restore event logged in the audit trail — every restore action is recorded with the actor, timestamp, result, and new issue key. The audit trail is immutable. See Audit Trail for details.
-
Option to remove the backup record — if the "Remove record after restore" checkbox was selected, the snapshot is cleaned up automatically on success.
Basic vs Extended tracking profiles
The tracking profile determines what data is captured at deletion — and therefore what is available for restore.
| Capability | Basic | Extended |
|---|---|---|
| Issue fields (summary, description, status, priority, custom fields) | ✅ | ✅ |
| Reporter, assignee, creator | ✅ | ✅ |
| Labels, components, fix versions | ✅ | ✅ |
| Instant coverage — captures fields from the deletion event itself | ✅ | ✅ |
| Continuous sync — listens to all issue change events and keeps copies | — | ✅ |
| Comments with author attribution | — | ✅ |
| Worklogs with duration, author, and date | — | ✅ |
| Issue links with type and direction | — | ✅ |
| Subtasks with full field data | — | ✅ |
| Project Scan recommended for existing issues | No | Yes |
Start with Basic if you need instant protection with zero configuration. Basic profile captures core fields directly from the deletion event — no prior sync needed. It covers every issue deleted after tracking is enabled, including issues created before Restorify was installed.
Use Extended for production projects, compliance-sensitive environments, and any project where comments or worklogs have business value. Extended profile continuously listens for all change events on tracked issues and maintains up-to-date copies of comments, worklogs, custom fields, and links. A one-time Project Scan is recommended to backfill data for issues that existed before Extended tracking was enabled.
Frequently asked questions
Can I recover an issue that was deleted before Restorify was installed?
Only if tracking was enabled for the project before the deletion occurred. Basic profile captures core fields from the deletion event itself — so it works instantly for any issue, including ones created years earlier. Extended profile continuously tracks changes and maintains copies of comments, worklogs, and links — but requires a Project Scan to backfill data for issues that existed before Extended tracking was enabled. If tracking was not active at the time of deletion, the data was not captured and cannot be recovered.
Does the restored issue keep the same key?
No. Jira does not allow reusing keys from deleted issues. The restored issue receives a new key (e.g., PROJ-456 instead of PROJ-247). The original key is preserved in the snapshot metadata for reference.
What happens if the project was deleted too?
The restore will fail because the target project no longer exists. Create or restore the project first, then retry the issue restore. The snapshot is not affected by the failure — you can retry as many times as needed.
Can I restore only comments without recreating the full issue?
No. The restore always creates a new Jira issue. Comments, worklogs, links, and subtasks are optionally added to it. You cannot inject comments into an existing issue. To extract specific data without creating an issue, use the Export function (JSON or CSV).
How long are deleted issue snapshots retained?
The default retention is 90 days. This is configurable in Jira admin settings → Restore Deleted Issues → Retention. After the retention period, records are automatically removed. See Retention Policy for configuration details.
Related reads
- What Happens When You Delete a Jira Issue — and Why There Is No Undo — the full deletion mechanics explained
- Restorify product page — feature overview, pricing, and screenshots
- Initial Setup guide — add your first project to tracking in under 60 seconds
- Tracking Profiles — Basic vs Extended — what each profile captures
Set up automatic deletion tracking in under 60 seconds
Add your projects to tracking — every deletion is automatically captured with a full snapshot. When the next incident happens, recovery takes one click.
Start trial on Marketplace